
|

|
Forum Index : Electronics : nanoverter build
| Author | Message | ||||
renewableMark Guru Joined: 09/12/2017 Location: AustraliaPosts: 1678 |
Nice progress Poida. This has been a multi national collaboration of many to get to this point, Tinyt with his circuit design skills, Poida with the concept/idea and software, and a few with hardware suggestions, well done everyone. Looking forward to connecting this to a decent size power board. Cheers Caveman Mark Off grid eastern Melb |
||||
| poida Guru Joined: 02/02/2017 Location: AustraliaPosts: 1418 |
I have improved the transient response in the nano1 code. This is where the closed loop control is keeping the output voltage at the setpoint. I looked at what happens if I remove the digital low pass filter that is applied to the Vfb signal. I used this in my other prototypes and it worked well in removing noise from the AC output Vfb signal. In the case of the nanoverter we already have a low pass filter on this signal. This is implemented with an active LP filter, U10 on the schematic. The results are good. Again, same testing conditions as a previous post in this thread. with the digital LP filter in place: 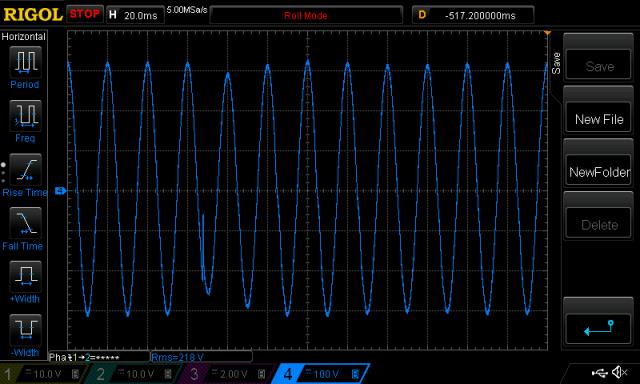 and with it removed: 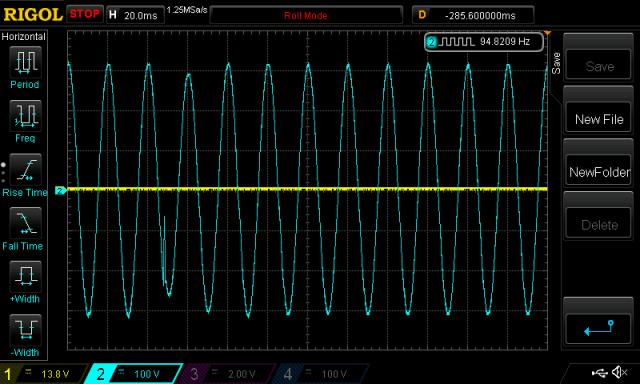 This is a lot faster recovery. And to my eyes it seems there is less overshoot. I would estimate it took 2 cycles to return to the setpoint, compared with 4 or more cycles with the previous code. So I want to continue with this code from now on. 2019-02-18_174922_nano_1_v6_no_bessel.ino.zip My thoughts on this: The slower recovery and more overshoot is due to the phase change and delay that is included in the digital low pass filtered signal, compared with the unfiltered input. The closed loop control does not like extra delay in it's input, I had to moderate the gain and damping to maintain a good safety margin to prevent uncontrolled oscillation. With no digital filtering, and no change to the PID control, we get much more responsive behavior. Simpler code too. I might need to test this against some significantly sized loads, maybe instability will rear it's ugly head then. I doubt I will attempt an open loop control scheme, this current code performs as well as I can see we need. wronger than a phone book full of wrong phone numbers |
||||
renewableMark Guru Joined: 09/12/2017 Location: AustraliaPosts: 1678 |
Hey Poida, have you tested the control board on a big power board and given it some curry yet? Also re R23/R54, you are using 54 yeah? Cheers Caveman Mark Off grid eastern Melb |
||||
| poida Guru Joined: 02/02/2017 Location: AustraliaPosts: 1418 |
Not yet, Mark. But when you visit on the weekend, I will stick the 3 bar radiator on it. This is about 100A on the primary. I am not using the SCR shutdown circuit yet. In fact, I have no current sensor function so far. I'm not sure I understand the R54/R23 design issue. The way I see it is R54 is needed to be across the current transformer. This is to limit the voltage that is then applied to the diode bridge. 1N4007 diodes have an upper voltage limit before breakdown. We do not want to exceed this, so if the current tranny does not have a resistor built in, we need R54. The diode bridge then sees a small load of about 470 Ohms, and this might be enough to "switch on" the diodes. At least that is my understanding. R23 might not be needed at all. I clearly need guidance from TinyT and others with this. wronger than a phone book full of wrong phone numbers |
||||
| tinyt Guru Joined: 12/11/2017 Location: United StatesPosts: 438 |
That SCR circuit was taken from oztules design with the added option of selecting where to place the current transformer load resistor. The oztules design has the load resistor after the diode bridge and there were suggestions of moving it before the diode bridge (right at the current transformer output). So, the PCB gives you a choice where to put it. Here is the way I understand the circuit. The scr data sheet says it needs typically 0.5V between gate and cathode to trigger it to conduction. This voltage will be coming from the wiper of the 2K trimpot R25. The positive terminal of R25 is connected to a 1K resistor R26 with its other end connected to the anodes of the diode bridge. Assuming that the trimpot wiper is set at midpoint, then the diode bridge has to output 1.5V(peak) to trigger the SCR. The current thru the 1K and 2K will be (1.5)/(1000+2000) = 0.0005A(peak). The drop across the 1k8 R22 gate series resistor is assumed negligible for a trigger current of 50 uA. If the load resistor is R23 (after the diode bridge), for SCR triggering, the current thru it will be (1.5)/(120) = 0.0125A(peak). The current thru the diode bridge will be 0.0005 + 0.0125 = 0.013A(peak) or (0.013)/(1.414) = 0.0092A(rms). This same current has to be supplied by the transformer for SCR triggering. Looking at a 1N4007 data sheet forward voltage characteristic curve, at this current the forward voltage drop is roughly 0.6V. So the output of the current transformer has to be 1.5 + 2*(0.6) = 2.7V(peak). If R54 is installed instead of R23, the output of the transformer still has to be 2.7V(peak). But the current thru R54 is (2.7)/(120) = 0.0225A(peak) For SCR triggering, the current transformer has to supply 0.0005 + 0.0225 = 0.023A(peak) or (0.023)/(1.414) = 0.0163A(rms). Assuning the current transformer used has a 1:1000 ratio. For the R23 configuration, the SCR will trigger if the primary current is 1000*(0.0092) = 9.2A. If this is the current going thru the load of the inverter, then the SCR will trigger with an inverter load of 230*(9.2) = 2116 watts or higher. For the R54 configuration, the SCR will trigger if the primary current is 1000*(0.0163) = 16.3A. If this is the current going thru the load of the inverter, then the SCR will trigger with an inverter load of 230*(16.3) = 3749 watts or higher. I hope I did not make any mistakes in my understanding and calculations. |
||||
renewableMark Guru Joined: 09/12/2017 Location: AustraliaPosts: 1678 |
So the initial Oz design used the resistor in position 23, Tinkers suggestion was to place it where 54 is. Then Tinyt gave us the option to choose the position, either or. I know Oz has had his running for a few years and my Mad controller has worked well since it got put in 6 months ago, both use position 23. Combined with Wiseguys comment at the bottom of p45 here I think I'll use 23 not 54. Cheers Caveman Mark Off grid eastern Melb |
||||
| poida Guru Joined: 02/02/2017 Location: AustraliaPosts: 1418 |
Thanks tinyt for the info. wronger than a phone book full of wrong phone numbers |
||||
| poida Guru Joined: 02/02/2017 Location: AustraliaPosts: 1418 |
Issues with mains sync, I have a few. One is to do with the closed loop output voltage control and adding a current source to the local circuit (micro grid) such as a generator. What would this mean? scenario: So the inverter is up and running, with say a 80% power duty cycle on the PWM. and we have a stable output voltage of maybe 230V AC. We then start up a generator and the board achieves sync. The relay switches accordingly and the generator is now connected to the local circuit. If the inverter has an output voltage setpoint greater than the generator, then the inverter will be a current source and feed current into the generator's output. Maybe the gen will increase its revs...Maybe it will show an overload condition, who knows. Maybe the inverter blows up or the contact breakers open, isolating the gen from the local circuit. The inverter will continue to work at maintaining the required output voltage as normally expected if nothing goes wrong. Now, if the inverter has a setpoint lower than the generator, then the generator should become the current source, and feed current into the local circuit, raising the voltage. This is where I expect exciting things to occur (put on your safety goggles) The inverter closed loop output voltage control will see a larger voltage than the setpoint and so start reducing the duty cycle %. It will keep seeing a voltage larger than the setpoint and so will continue to reduce the duty cycle %, ultimately reaching 1% power. And still the output voltage will be larger than the setpoint. I have no idea what will happen under these circumstances. An external synchronous current source will provide a charging current to the battery. That is the idea, just as the GTI inverter is used. I wonder if I need to address this in some way. Maybe changing nano1 code to simply maintain duty cycle % after recognising mains sync has been achieved and stop running the closed loop output voltage control. This mains sync feature is a real brain twister. wronger than a phone book full of wrong phone numbers |
||||
renewableMark Guru Joined: 09/12/2017 Location: AustraliaPosts: 1678 |
Thanks for having me over Yesterday Poida. Glad to see my construction skills have improved and both control boards did what they were meant to. When a GTI is added to the "mini grid" they are designed to feed as much power as possible to the street grid, so they work the same in the mini grid, Oz, Mad, Clockman and others have demonstrated this. Mad created his GTI controller to effectively throttle back the DC inputs to the GTI to prevent excessive backfeeding and cooking the battery bank. So if we add a synced gen to the mini grid instead, it should in theory do the same. I know when my gen has no load on it the revs stay at it's idle set point, when a heavy load is placed on it revs up to meet the demand. A possible problem that may happen is that the generator sees the mini grid as too big of a load and it cuts off in overload condition. Something like the Mad GTI controller may be needed, this time controlling AC. BUT maybe it will be a simple case of setting the inverter voltage to just slightly below the Gen voltage so the gen doesn't see the mini grid as too big of a load. Cheers Caveman Mark Off grid eastern Melb |
||||
| Tinker Guru Joined: 07/11/2007 Location: AustraliaPosts: 1904 |
Mark, are you sure the "revs" change? Remember, its the AC generators revolutions that determines the AC frequency, unless its an inverter type genny of which I know nothing. Me thinks you hear a different tone from the exhaust due increased load, nor "revs". If you have an optical tacho, make a chalk mark on the flywheel and test this  . .Klaus |
||||
renewableMark Guru Joined: 09/12/2017 Location: AustraliaPosts: 1678 |
Mine is an inverter type. It's all in a big box with covers all around it so not too easy to check revs. I'm pretty sure on eco mode it revs down then on normal it revs up, then when a load is placed it certainly gets louder, perhaps that's just it working harder, dunno, I'm not too bright. Cheers Caveman Mark Off grid eastern Melb |
||||
| Tinker Guru Joined: 07/11/2007 Location: AustraliaPosts: 1904 |
Yes, inverter type gennies do change revs to suit the load. The Ac frequency is generated electronically with these. I was not sure if you had one of these older diesel generators  . These have a governor to keep the revs constant despite varying loads. . These have a governor to keep the revs constant despite varying loads. Klaus |
||||
| poida Guru Joined: 02/02/2017 Location: AustraliaPosts: 1418 |
I've just completed building one of Madness's power boards. I fitted only 3 MOSFETs per leg of the bridge. It worked first time when I fitted one MOSFET each end, to save repair grief. So I put another 2 on each end. See it powered by the nanoverter. The primary is 45uH E core ferrite and a 1500W Areosharp toroid. The capacitor is on the 240V end and is 10uF. It produces a nice clean output as seen below. 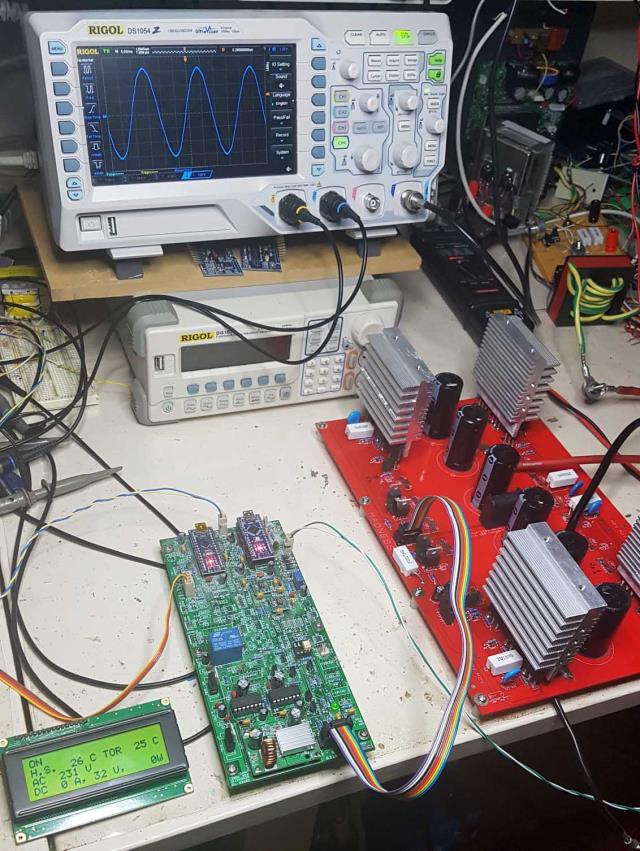 It's a credit to Madness to design and provide these good quality boards. I notice one thing already and that is the board does not like running at less than about 32V DC supply. This is non-optimal for me, I test on the bench with a 27V supply. I wonder if I change one component (the 18V zener) if I could get it to be happy down to about 22V? Load tests will happen when I can run it at 22V. I have no way of providing a 48V battery near the work bench. wronger than a phone book full of wrong phone numbers |
||||
renewableMark Guru Joined: 09/12/2017 Location: AustraliaPosts: 1678 |
Good work Poida, I gave up on the 8010 based control card and got my nano running the Mad power board now. Need to fit more fets and capacitors then re test but looks great so far. Started and stopped it 50 times in a row on full power and nice even start every time. NO BANG! 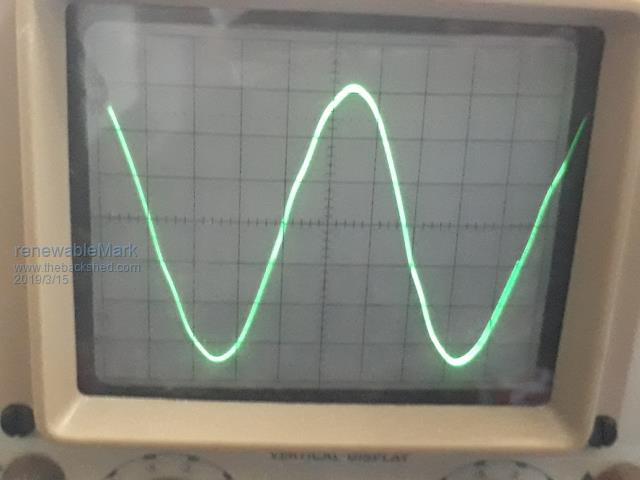 Cheers Caveman Mark Off grid eastern Melb |
||||
| poida Guru Joined: 02/02/2017 Location: AustraliaPosts: 1418 |
latest code 2019-03-15_222619_nano2_1.ino.zip 2019-03-15_222643_nano_1_v7_no_bessel.ino.zip still has SCR shutdown disabled, I can't test this while my board does not have current sensors missing and the SCR sub circuit. Improvements: DC volts displayed with 2 digits and one decimal point, eg 27.4V Much better mains sync, with about 1/2 to 1/4 of the previous phase jitter. wronger than a phone book full of wrong phone numbers |
||||
| tinyt Guru Joined: 12/11/2017 Location: United StatesPosts: 438 |
Good work Mark. I don't know much about the Mad power board, but it's totem pole driver probably minimizes 'ground bounce' and its bad effects. Thanks poida. More code for me to learn from. I am still busy with other stuff, but one of this days I hope. |
||||
renewableMark Guru Joined: 09/12/2017 Location: AustraliaPosts: 1678 |
Do you want to borrow 4 of those 200AH agm's for a week or so? It's reassuring for me if we all play with the same voltages settings etc. Perhaps you could use my spare control board for SCR tests? Cheers Caveman Mark Off grid eastern Melb |
||||
| poida Guru Joined: 02/02/2017 Location: AustraliaPosts: 1418 |
Mark, thanks for the offer of the 4x batteries. I doubt the floor will hold this sort of weight. I already broke a floor in the downstairs room from too many batteries, had to replace 1/3 of the joists... I tried Madness's power board with 15V and then a 12V zener, located near the big regulator transistor. The 12V zener allowed me to run it down to about 22V DC supply. The gate drive waveforms did not look good at all, the high side switch on events now have a lot of oscillation. I nearly blew one of the electrolytic caps around this transistor too. I fitted a 25V 100uF and it could not deal with 57V supply...what is that smell? I have fitted a 100V 100uF in it's place. Latest code now has SCR high current cut-off. And it has 3 plus 1 decimal format for DC current, DC supply voltage and AC current.  here is the SCR over current cut-out behaviour. Dark Blue is AC output voltage Pink is low side PWM, undersampled so it does not look quite right. Light Blue is the "AC Current" signal I fed into the diode bridge. I used a simple 5V voltage from a potentiometer, which I am winding up to the SCR threshold. 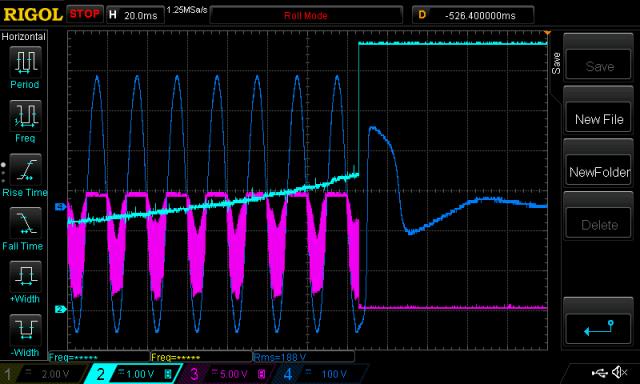 This shows the simulated AC current signal rise to about 3.4V DC then the SCR triggers. This shuts down the gate drive IC outputs in the middle of a wave form. No waiting for a zero crossing. It shuts down immediately. We can see my transformer/inductor/capacitor/output load ring a little at it's resonant frequency afterwards. Now I have the SCR circuit in place and operational, I now see a need for better AC current calibration. So the nano2 code will be expected to change a bit, to allow an offset and gain for the AC current input to the nano2 ADC input. At zero current, there is about 0.167V on this pin. There is something feeding a bit of voltage into the wiper of r25 trimpot. No idea what. This is the node where the nano2 AC current voltage signal is sensed. I have found that resetting the SCR is rather fiddly, it is very sensitive to bounce contacts. The most reliable way to reset is to remove the inverter power, draining the nanoverter DC-DC converter completely. latest code: 2019-03-17_215828_nano2_1.ino.zip 2019-03-17_215850_nano_1_v7_no_bessel.ino.zip The above code has some test values in place for calculating AC current. This will change in the future. wronger than a phone book full of wrong phone numbers |
||||
| tinyt Guru Joined: 12/11/2017 Location: United StatesPosts: 438 |
I think there is a flaw in the shutdown switch reset connection. Right now activating the switch shorts the scr making the current flowing thru it go to zero. But this also charges C25 (scr gate filter) to +5V, so when the scr reset switch opens, I think what happens is the scr gets re-triggered by the charge on C25 and also C27. I should have used a normally closed switch in series with the anode of the scr to reset it. Try the following modification to the pcb and use a normally closed switch. This is pcb top modification: 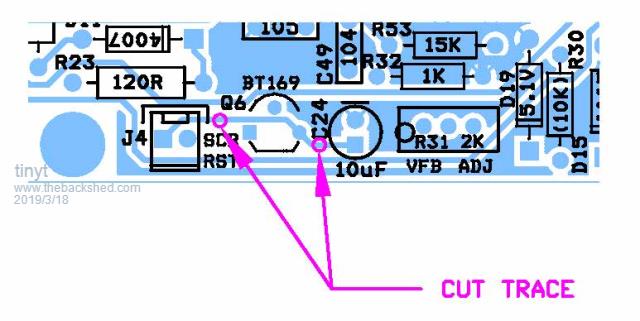 This is pcb bottom modification: 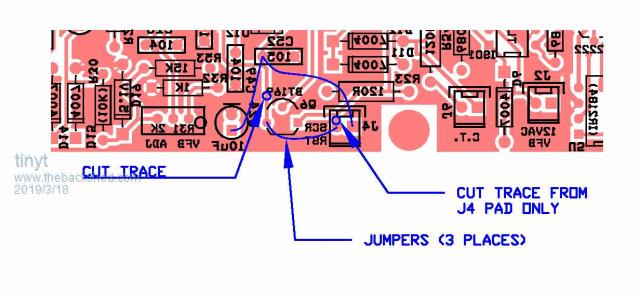 |
||||
| poida Guru Joined: 02/02/2017 Location: AustraliaPosts: 1418 |
Tinyt: I made the mods as above. It does not work at all now. When the reset pins are shorted, it triggers, disabling gate IC output and signalling to nano2 "SCR over current" When the reset pins are open, no voltage up to 0.75V will trigger the SCR. I measure SCR trigger voltage at one end of R22, near C51. This node is equivalent to SCR gate pin but more accessible for meter clips. 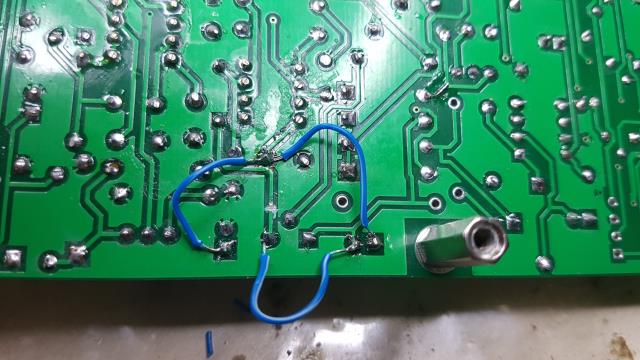 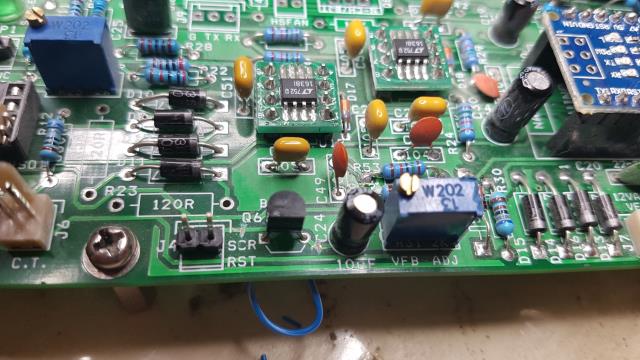 wronger than a phone book full of wrong phone numbers |
||||