| |
  Page 2 of 4 Page 2 of 4   |
| Author |
Message |
brucedownunder2
Guru

Joined: 14/09/2005
Location: AustraliaPosts: 1548 |
| Posted: 10:30pm 07 Oct 2011 |
 Copy link to clipboard Copy link to clipboard |
 Print this post |
|
Hi Crew,
Klaus, I used ordinary car alternator brushes -- high resistance can be guaranteed ,compared with copper inpregnated starter motor type brushes..
Junk yards are full of starter motors -- just wander around and scrounge a couple --- if the oh&s police let you -- we used to crawl around these joints all weekend when I was a kid --even took our toolbox --- Not now that they have bundled us poor little indefensive accident prone creatures in cotton wool and detol..
Lol , but it's true...
Bruce.
Bushboy |
| |
Air Bender
Senior Member

Joined: 25/01/2011
Location: AustraliaPosts: 206 |
| Posted: 02:05am 08 Oct 2011 |
 Copy link to clipboard Copy link to clipboard |
 Print this post |
|
Hi Greg,Klaus and Bruce,
Thanks for the information Greg I will try machining a bit and see what comes of, If it is a peice of bearing tube it is more likly to be bronze. I am colour blind which makes it hard to pick, but I will get someone with better eyes than mine to have a look.
I like the idear of using calapers something similar to what spirtsfire used instead of normal brush holders, to me it looks to be more fail safe, I could adapt some starter motor brushes to that set up or if I find I have bronze rings I might have a go at making some copper brushes. I have plenty of room around the rings so I dont need to be setting up something realy small and fiddly.
All the best Dean. |
| |
Air Bender
Senior Member

Joined: 25/01/2011
Location: AustraliaPosts: 206 |
| Posted: 10:15am 08 Oct 2011 |
 Copy link to clipboard Copy link to clipboard |
 Print this post |
|
Hi all.
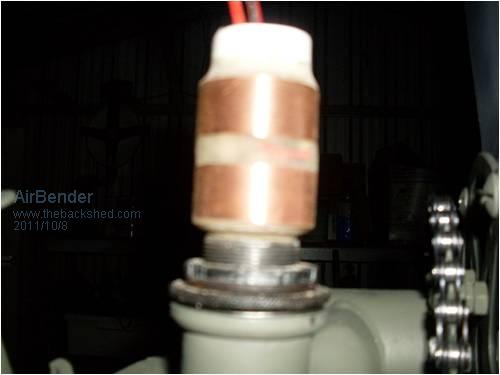
I drilled a hole in the pipe tonight and I got a long continuous swarf come of, so now I know I have copper rings, so thanks again for your help here Greg.
The next thing is to hunt down some starter motor brushes.
All the best Dean. |
| |
paceman
Guru

Joined: 07/10/2011
Location: AustraliaPosts: 1329 |
| Posted: 12:13pm 08 Oct 2011 |
 Copy link to clipboard Copy link to clipboard |
 Print this post |
|
Hi Dean,
The colour in the photo certainly looks more like copper than brass or bronze too, so I reckon you're right.
Thinking about the maintenance problems apparently reported for graphite brushes - maybe it's partly to do with forward and reverse rotation required for this application. With most normal motor/alternator applications the rotation would always be one-way - hence the feathering you tend to see on trailing edges of used brushes. Those fine edges would easily break off with reverse rotation. Maybe if you do use them it would help to make sure there's a small champfer on both leading and trailing edges.
Greg |
| |
Air Bender
Senior Member

Joined: 25/01/2011
Location: AustraliaPosts: 206 |
| Posted: 10:26pm 08 Oct 2011 |
 Copy link to clipboard Copy link to clipboard |
 Print this post |
|
Hi Greg,
What I am thinking about trying if I can find sime graphite brushes thick enough is to make my own brush holders and have the side of the brushes up against the ring instead of the ends so the brush wears through the centre.
I think this type of set up may a bit more forgiving if there is a bit of asentric movement in the rotation. And there wouldnt be sharp corners forming in the ends of the brushes.
All the best Dean. |
| |
paceman
Guru

Joined: 07/10/2011
Location: AustraliaPosts: 1329 |
| Posted: 01:19pm 09 Oct 2011 |
 Copy link to clipboard Copy link to clipboard |
 Print this post |
|
Hi Dean,
Sounds a better idea - but it's quite weak and brittle stuff so you'd need to have it well aligned and supported. I wonder what the Melbourne Metro tram people use for the sliding contact thing (pen....icon?) on top of the trams - they must be replacing those regularly - maybe a visit to one of their depots? Mind you their voltages are lots higher (like thousands).
For what it's worth - we used to buy solid graphite to machine induction furnace crucibles from either Union Carbide or Le Carbone here in Melbourne. There are several different grades, maybe the copper impregnated one mentioned by someone earlier is available too. Failing that, I reckon contact a repairer of big motors here in Melbourne - we used one in Thomastown but I don't remember their name - they'd probably have big brushes they throw away.
Greg
|
| |
Air Bender
Senior Member

Joined: 25/01/2011
Location: AustraliaPosts: 206 |
| Posted: 03:50am 10 Oct 2011 |
 Copy link to clipboard Copy link to clipboard |
 Print this post |
|
Hi Greg and crew,
I picked up some starter motor brushes from our local truck repairer that I think should do the job.
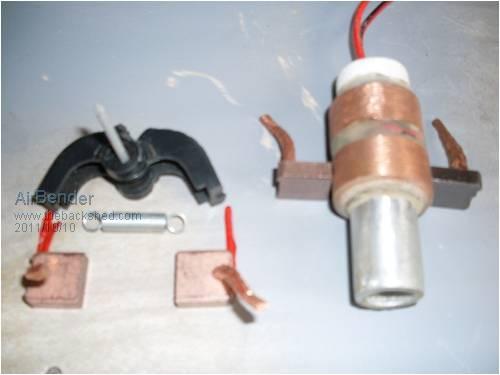
This is basic lay out of the holders I want to build. I need to make extensions from the hinge point that will hold the brushes and that a spring can connect to.
All the best Dean
|
| |
Tinker

Guru

Joined: 07/11/2007
Location: AustraliaPosts: 1904 |
| Posted: 01:12pm 10 Oct 2011 |
 Copy link to clipboard Copy link to clipboard |
 Print this post |
|
Dean, I think that pivoting the spring pressure for two brushes from just one point is not a good idea. I have never seen it used on any brush set up. You will put a non radial pressure on the brushes that is trying to push them out of alignment. The only way to get near radial pressure is if the pivot arms are pivoted individually for each brush.
Why not doing it the way all brushes seem to work: a separate spring behind each brush pushing it radially to the slip ring?
If it is too difficult to use your clamp parts that way you should be able to bend up two simple rectangular brush housings from a piece of metal strip, make it long enough to hold a compression spring behind the brush. Or recycle the spiral springs that are usually used on starter brushes. If your manufactured brush housings have a mounting tang, fitting the pair should be easy.
Lastly, orient your brushed at right angles to the way shown in the picture above, it will be much easier to bed them in for full face contact.
Klaus |
| |
brucedownunder2
Guru

Joined: 14/09/2005
Location: AustraliaPosts: 1548 |
| Posted: 09:24pm 10 Oct 2011 |
 Copy link to clipboard Copy link to clipboard |
 Print this post |
|
Hi Guys ,, I have a multiple brush stack that uses that idea with the single spring . It seems to have been a fairly common set up for big electric motors . I think on the exciter winding as the brush set up is only around a 30-40 mm slipring ..
Your truck repairer looks as if he has given you the copper inprenated brushes by their color..
Bruce
Bushboy |
| |
Air Bender
Senior Member

Joined: 25/01/2011
Location: AustraliaPosts: 206 |
| Posted: 09:39pm 10 Oct 2011 |
 Copy link to clipboard Copy link to clipboard |
 Print this post |
|
Hi Klaus.
You got me thinking just in time I have just about finished bending up the metel for the brush arms and holders. I can see your point about the non radial pressure on the brushes, but I think I can get around this.
What I am now about to do is to square the brushes of to the pivot point of the arms, and then draw a curve from the center of the brush following the movement of the brush arm. If I have this curve line up with the centre of the rings, this will give me a square contact to the rings and should remain so even as the brushes wear. Each brush will pivot independently but just share a common pivot point.
I think I have seen some brushes set up this way before, If not there is a first time for everything.
All the best Dean |
| |
Air Bender
Senior Member

Joined: 25/01/2011
Location: AustraliaPosts: 206 |
| Posted: 09:55pm 10 Oct 2011 |
 Copy link to clipboard Copy link to clipboard |
 Print this post |
|
Hi Bruce you sliped in while I was typing they look to have plenty of copper in them. I nearly finnished the the brush holders and arms and have just altered the angles a bit. I hope to get this together in the next day or so but at the moment I need to get to bed and sleep as I just got home from a 12 hour night shift, but now I have 4 days off. 
All the best Dean. |
| |
Air Bender
Senior Member

Joined: 25/01/2011
Location: AustraliaPosts: 206 |
| Posted: 09:32am 11 Oct 2011 |
 Copy link to clipboard Copy link to clipboard |
 Print this post |
|
Hi all,
I didnt have much time to do much today but I got the brush holders and arms made up.
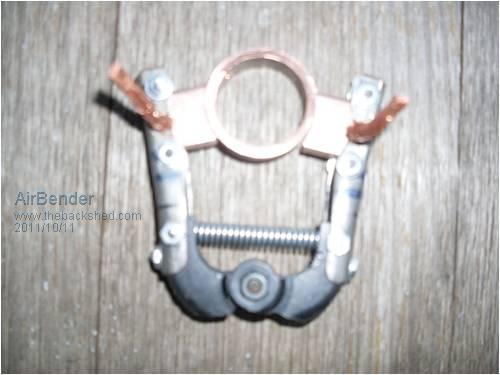
The brushes are very slipery on the rings and there is hardly any resistance when you rotate them around the ring with good tension on the spring.
Before I mount these on the mill I will draw up the arm rotation curve on paper so I can measure the distance the arm pivot point needs to be away from the ring.
Having the spring back near the pivot point means that the brushes can move a long way in or out with not much movment at the spring, so there will be hardly any tension lost as the brushes wear.
All the best Dean |
| |
Tinker

Guru

Joined: 07/11/2007
Location: AustraliaPosts: 1904 |
| Posted: 02:35pm 11 Oct 2011 |
 Copy link to clipboard Copy link to clipboard |
 Print this post |
|
Now you got me even more confused Dean  . Perhaps the picture is misleading but it looks as both brushes contact the *same* slip ring. One brush to each ring requires the arms to be offset or are you making two sets of what's pictured?? . Perhaps the picture is misleading but it looks as both brushes contact the *same* slip ring. One brush to each ring requires the arms to be offset or are you making two sets of what's pictured?? 
Klaus |
| |
brucedownunder2
Guru

Joined: 14/09/2005
Location: AustraliaPosts: 1548 |
| Posted: 09:53pm 11 Oct 2011 |
 Copy link to clipboard Copy link to clipboard |
 Print this post |
|
Yeah,, this is what I referred to as "dual" brushes -ie 2 per slipring ..
Then you just stack the other 2 sets (for a 3 phase system).
Bruce.
Bushboy |
| |
Air Bender
Senior Member

Joined: 25/01/2011
Location: AustraliaPosts: 206 |
| Posted: 10:01pm 11 Oct 2011 |
 Copy link to clipboard Copy link to clipboard |
 Print this post |
|
Hi Klaus,
I have two sets of what is pictured. Two brushes per ring and both sets of brushes, one will be mounted one above the other. They will be mounted by a rod going through both pivot points with a small spacer between them.
All the best Dean. |
| |
Air Bender
Senior Member

Joined: 25/01/2011
Location: AustraliaPosts: 206 |
| Posted: 02:58am 12 Oct 2011 |
 Copy link to clipboard Copy link to clipboard |
 Print this post |
|
Hi all,
The slip ring set is nearly ready to be mounted on the mill, I just need to weld on a mounting bracket.
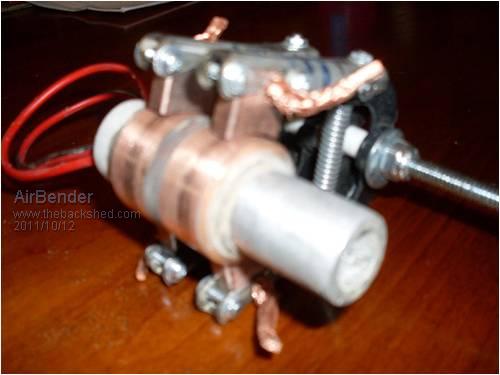
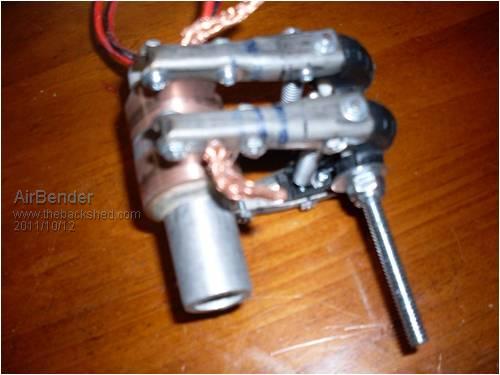
I was lucky I found a bolt that had the unthreaded part at the top long enough so none of it is piviting on thread.
As bruce said it would not take much to build this as a 3 phase set up.
All the best Dean.
|
| |
Air Bender
Senior Member

Joined: 25/01/2011
Location: AustraliaPosts: 206 |
| Posted: 07:56am 12 Oct 2011 |
 Copy link to clipboard Copy link to clipboard |
 Print this post |
|
The sliprings mounted on the mill.
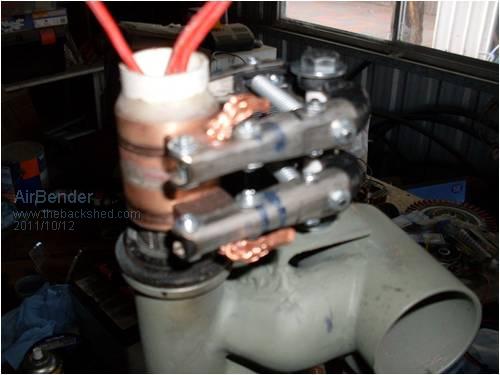
I will need to make a cover to keep the rain out.
All the best Dean.
|
| |
Tinker

Guru

Joined: 07/11/2007
Location: AustraliaPosts: 1904 |
| Posted: 02:12pm 12 Oct 2011 |
 Copy link to clipboard Copy link to clipboard |
 Print this post |
|
Very neat Dean. Next question  , how are you going to connect the pigtails of the brushes? , how are you going to connect the pigtails of the brushes?
Klaus |
| |
Air Bender
Senior Member

Joined: 25/01/2011
Location: AustraliaPosts: 206 |
| Posted: 09:31am 13 Oct 2011 |
 Copy link to clipboard Copy link to clipboard |
 Print this post |
|
Hi Klaus,
I plan to solder some lugs onto the brush pigtails, then I will drill some holes though the brush arms and put in some small bolts as terminals and then I will run a wire from one arm to its partner on the other side which will link the two brushes together. The wires from the motor are long enough to reach the brush arms so I will just connect them onto the brush arm terminal bolts as well. I have put some terminal bolts through the pvc pipe at the top of the rings which I have terminated the wires from the rings onto and which I will conect the wires coming up the pole onto.
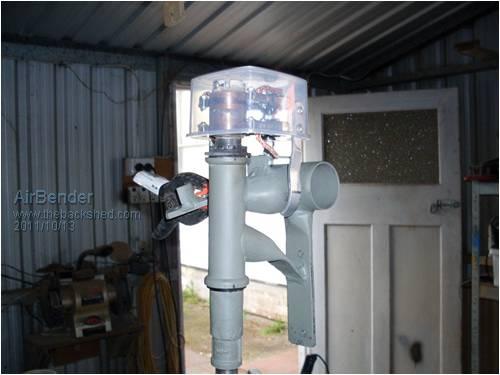
I found a plastic container that you store food in the fridge which fits OK as a cover. I want to use plastic as there will not be any problem with anything shorting against it, but I dont know how it will stand up to the sun, alot of plastics break down in the sun. I was woundering if I sanded it with fine sandpaper and painted it how well paint would stick to it, I have some auto primer which may stick to it.
All the best Dean
|
| |
Rastus

Guru

Joined: 29/10/2010
Location: AustraliaPosts: 301 |
| Posted: 11:36am 13 Oct 2011 |
 Copy link to clipboard Copy link to clipboard |
 Print this post |
|
Hi Dean,
I admire your work!Cheers Rastus
see Rastus graduate advise generously |
| |
| |
  Page 2 of 4 Page 2 of 4   |

