|

|
Forum Index : Microcontroller and PC projects : SD Card Problem
| Page 1 of 3 |
|||||
| Author | Message | ||||
| cosmic frog Senior Member Joined: 09/02/2012 Location: United KingdomPosts: 284 |
Hi, just built my colour Maximite using a UBW32 which was previously a monochrome Maximite using MMBASIC 3.2. Done all the re-wiring, flashed it with MMBASIC 4.0. works great except for the memory card, it just says "cannot access the SD card". I've checked and re-checked all the wiring and all looks good. The SD card isn't in a socket but solded staight to wires and then to the UBW32 board, so not a socket problem. I've noticed the use of a 2.2ohm resistor on the 3.3volt line which wasn't present on the monchrome Maximite, is it possible that not enough power is going to the SD card? I hope someone can help. Thanks. Dave. |
||||
| cosmic frog Senior Member Joined: 09/02/2012 Location: United KingdomPosts: 284 |
Also I've noticed the curser sometimes doesn't appear! |
||||
| cosmic frog Senior Member Joined: 09/02/2012 Location: United KingdomPosts: 284 |
Sorted. Bypassed the 2.2ohm resistor and all works well. Thanks. Dave. |
||||
donmck Guru Joined: 09/06/2011 Location: AustraliaPosts: 1313 |
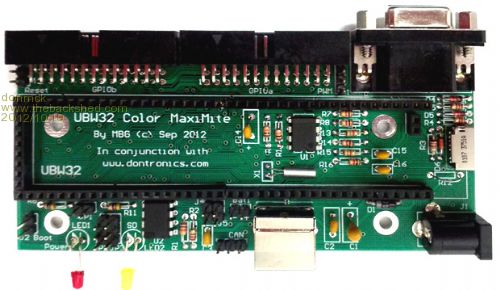
Mick designed the UBW32-MCC-PCB: http://www.dontronics-shop.com/ubw32-mcc-pcb-letter.html and obviously noted the differences and tested it both ways: 
See R12 near the SD card. He has it shorted out. I spoke to him this morning about it. His response: I also ran with it shorted as can be seen in the actual picture R12 just above the power jack.
So I don't think its critical. Don... https://www.dontronics.com |
||||
| cosmic frog Senior Member Joined: 09/02/2012 Location: United KingdomPosts: 284 |
Thanks for that Don, It's good to have this confirmed. I was a little worried that I'd blown something. Dave. |
||||
| Zougie Newbie Joined: 04/10/2012 Location: AustraliaPosts: 18 |
Hi Guys, I have exactly the same issue on two UBW32 MCC's which has not been rectified by shorting out R12 and am now beginning to suspect a possible issue with the fact that I used the UBW32 bootloader to load the Colour MMbasic V4.0. Both MCC`s fire up but the SD card cannot be found. Has anyone else had this very same issue? If so, which version of the Maximite bootloader would be most preferable. By the way, I did try flashing the V4.0 software with the bootloader into the UBW32 using a Pickit3, but it would not fire up once programmed which is why I went back to the UBW32 bootloader. Looking forward to some of your thoughts. Cheers, George |
||||
MicroBlocks Guru Joined: 12/05/2012 Location: ThailandPosts: 2209 |
I programmed it with the bootloader that is included in the mmbasic zip fie. That worked good. Microblocks. Build with logic. |
||||
bigmik Guru Joined: 20/06/2011 Location: AustraliaPosts: 2914 |
Gday George, I think you may not have flashed in the correct bootloader for the CMM. Use the Hex file that is included here CMM Construction Pack as that includes the bootloader with the HEX file (needs a PicKit3 to program it into the UBW32) As to your problem, the UBW bootloader shouldnt make any difference, have you tried different brands of SD card? Check that you dont have solder shorts or an unsoldered pin on your SD connector. regards, Mick Mick's uMite Stuff can be found >>> HERE (Kindly hosted by Dontronics) <<< |
||||
| Zougie Newbie Joined: 04/10/2012 Location: AustraliaPosts: 18 |
G'Day Guys, I did initially try flashing the file "ColourMM_plus_bootloader_V4.0.hex" into the UBW32 using a Pickit3 and MPLAB 8.x ....but it did not come to life when powered up. After many attempts at programming the PIC, I decided to try the native UBW32 bootloader which then allowed me to load the ColourMM V4.0 file. This then raises the question of what I was doing wrong in MPLAB? Any thoughts? Mick you made a good point regarding potential soldering issues on the SD card socket, I'll have another check....but you certainly were not joking about how difficult these are to solder!!! Overall, the board has come together very nicely thanks to your efforts. Cheers, George |
||||
bigmik Guru Joined: 20/06/2011 Location: AustraliaPosts: 2914 |
Hi George, Are you referring to my UBW32-MCC PCB? If so then I believe your problem might be with the soldering associated with the G3 and G4 pads on the microSD socket. You can test the function of the switch (G3 and G4) by using a meter to measure between GND and the pads for D5 and D6 of the UBW32 connector (see layout below). With a microSD inserted you should see GND appear at D5 and D6. If you dont get a GND connection on D5 and D6 (pins on the UBW32) then MMbasic will not detect the SD card at all.. You could prove this by shorting D5/D6 to GND and seeing if you can read the SD card then. The Pad for G3 is extremely hard to solder so I soldered it to the case first (the case is GND and the Pad should connect to GND so it makes it easier... I have a fair bit in the manual about soldering the uSD socket... maybe you saw an earlier version of the manual... Get the latest one HERE Kind Regards, Mick Mick's uMite Stuff can be found >>> HERE (Kindly hosted by Dontronics) <<< |
||||
bigmik Guru Joined: 20/06/2011 Location: AustraliaPosts: 2914 |
Sorry, I dont know how but I somehow duplicated my post.. Please ignore (or Gizmo please delete this post) Mick Mick's uMite Stuff can be found >>> HERE (Kindly hosted by Dontronics) <<< |
||||
| Zougie Newbie Joined: 04/10/2012 Location: AustraliaPosts: 18 |
Hey Mick, I had a look at my soldering (via a USB camera/microscope) on all of the rearwood connector pins (1-8) and they all looked good......but the G3 and G4 pins from memory have been missed entirely.....my bad! Now I have to lovingly pry off the outer housing of the micro SD slot and risk doing more harm, or just tell the ubw32-mcc that there's a card in place by simply shorting d5/d6 to gnd and leaving it at that. I'll give a go tomorrow evening and let you know if it's a success. Thanks again for some excellent advice. Cheers, George |
||||
bigmik Guru Joined: 20/06/2011 Location: AustraliaPosts: 2914 |
Hi George, The G4 pad is easy enough to solder once the uSD socket is `in place' especially if you use some `liquid flux' paste... just coat the area and hit with a SHARP pointed iron that has some solder on the tip... In retrospect I wish I made the PADs a bit larger for G3 and G4 but I made the artwork exactly to the specs given by the manufacturer... no doubt for a SMD solder bath method... The G3 pad is a bit harder to solder (if you didn't solder it to the case before fitting on the PCB).. If you have a VERY Sharp pointed iron is is possible but mine was a point but rounded at the end and I couldn't get in there.. I was able to solder my first one by flooding the area with flux and solder but that was a bit messy. Regards, Mick PS. I used a USB microscope as well to check the soldering for shorts/missed connections. Mick Mick's uMite Stuff can be found >>> HERE (Kindly hosted by Dontronics) <<< |
||||
| Zougie Newbie Joined: 04/10/2012 Location: AustraliaPosts: 18 |
Hi Guys, Good news! I took Mick's advice and persisted with the soldering of the g3/g4 pads on the micro sd socket which was certainly tricky, but paid off! I managed to get both units up and running with full sd card access. Now for the fun part. Thanks again for your excellent support! Cheers, George |
||||
bigmik Guru Joined: 20/06/2011 Location: AustraliaPosts: 2914 |
Great News, You are the first to report that you have got one working... (besides me of course) 
Regards, Mick Mick's uMite Stuff can be found >>> HERE (Kindly hosted by Dontronics) <<< |
||||
| Zougie Newbie Joined: 04/10/2012 Location: AustraliaPosts: 18 |
Mick, I'll now perform some tests on the i/o to make sure that all pins are accessable. Cheers, George. |
||||
bigmik Guru Joined: 20/06/2011 Location: AustraliaPosts: 2914 |
Hi George, You can always download TESTER3.BAS .. It is currently configured only for GPIO 1-20 but is easy enough to modify for 21-40 to test the IO.. I used my Test-A-Mite to do the testing... After the Melbourne Cup week is Over I intend to modify the program to include GPIO 21-40 as well.. but for now time has almost escaped me. Regards, Mick EDIT*** Of course depending on which way you have linked the JPX header the modifying the program will be easy or more dificult, if linked for `standard pattern' it will be easy, if linked for `Arduino pattern' it will be a bit all over the shop.. Mik Mick's uMite Stuff can be found >>> HERE (Kindly hosted by Dontronics) <<< |
||||
donmck Guru Joined: 09/06/2011 Location: AustraliaPosts: 1313 |
I can help a little here Mick. I made up a 21 to 40 pin test program from your original, so I could produce a video. Program is at: http://tinyurl.com/8gahyc5 called testubw.bas I just loaded it there. It is rough, as only 3 of the LED programs work. Just got it working enough to produce the video. video is at: http://www.youtube.com/watch?v=UV3U3g1YU4g&feature=youtu.be Will be enough to test the outputs to LEDs. Don... https://www.dontronics.com |
||||
| Zougie Newbie Joined: 04/10/2012 Location: AustraliaPosts: 18 |
Sounds like a plan to me! I'll give it a go this weekend and will keep you posted. Thanks again for your help! Cheers, George |
||||
| aargee Senior Member Joined: 21/08/2008 Location: AustraliaPosts: 255 |
Mick, Just finished the board and ran a quick test boots MM4 OK, keyboard OK, uSD OK. My UBW32 was hand assembled as well! I'll post some pics soon. Thanks, - Rob For crying out loud, all I wanted to do was flash this blasted LED. |
||||
| Page 1 of 3 |
|||||