|

|
Forum Index : Windmills : LG motor shaft
| Page 1 of 2 |
|||||
| Author | Message | ||||
| rjsc2000 Newbie Joined: 17/12/2015 Location: PortugalPosts: 13 |
Hi all First post in the forum :) I've bought a LG motor with 36 Poles and 48 magnets. But i've only bought the motor. Now i see i need some shaft to spin it otherwise the magnets will stick to the coils and i can't move it. I want to spin it in a bench so that i can do experiments and evaluate its performance. Has anyone devised a method to do this? How to replace the original shaft? Thanks Ricardo |
||||
| govertical Guru Joined: 11/12/2008 Location: United StatesPosts: 383 |
https://drive.google.com/file/d/0BwO5zSDThdxFSWlzdERaLXlUdkE/view?usp=sharing https://drive.google.com/file/d/0BwO5zSDThdxFOGwtOVM5QUF4SDg/view?usp=sharing https://drive.google.com/file/d/0BwO5zSDThdxFX3dBcl9KSHNDNGc/view?usp=sharing having problems posting photos from google drive Hi, this may give you some ideas. I used a 5/8 shaft and had to fabricate all the other parts. just because your a GURU or forum administer does not mean your always correct :) |
||||
| rjsc2000 Newbie Joined: 17/12/2015 Location: PortugalPosts: 13 |
A 5/8 (15,8 mm) shaft going through the hole of the rotor? How did you hold it to the rotor? Do you have any pictures? Thanks |
||||
| rjsc2000 Newbie Joined: 17/12/2015 Location: PortugalPosts: 13 |
I can see the links now. You don't have pictures of the inside do you? That would be the important part.. |
||||
| govertical Guru Joined: 11/12/2008 Location: United StatesPosts: 383 |
http://gallery.anotherpower.com/main.php/d/30290-1/DSCN3995.JPG Hi, I used an adapter plate. just because your a GURU or forum administer does not mean your always correct :) |
||||
| rjsc2000 Newbie Joined: 17/12/2015 Location: PortugalPosts: 13 |
Thanks. Those pics gave me some ideas |
||||
| govertical Guru Joined: 11/12/2008 Location: United StatesPosts: 383 |
I hope to see your results. I am using my to charge a 12 volt superCap bank. 50 Farads, stator is not modified, 2 amps about 10 min of cranking. Working on MPPT 10 amp circuit. Best of luck with your project, cheers. just because your a GURU or forum administer does not mean your always correct :) |
||||
| rjsc2000 Newbie Joined: 17/12/2015 Location: PortugalPosts: 13 |
Well, Its tougher than i thought. I have to engineer a shaft that goes right through the middle so that the magnets don't get stuck in one side. But making that it's difficult without the right tools. Can you tell me more about the materials used? I'm using wood just to test and because it's easier to work with. Thanks |
||||
| govertical Guru Joined: 11/12/2008 Location: United StatesPosts: 383 |
https://drive.google.com/file/d/0BwO5zSDThdxFWWNfbHVRdEp4T0U/view?usp=sharing https://drive.google.com/file/d/0BwO5zSDThdxFbHV4SWZlcFF3alk/view?usp=sharing Hi, The stator adapter plate has long bolts going through the bearing hub. I leave the adapter plate bolts loose then place a plastic shim between stator and the mag hub. I rotate the mag hub to center the stator then tighten the adapter plate bolts and remove the shim. I hope this helps. just because your a GURU or forum administer does not mean your always correct :) |
||||
| govertical Guru Joined: 11/12/2008 Location: United StatesPosts: 383 |
https://youtu.be/A4rj3sRL8hw http://gallery.anotherpower.com/main.php/d/30290-1/DSCN3995.JPG Hi, here is a video, it may help. Please post some photos of what you have at this time. just because your a GURU or forum administer does not mean your always correct :) |
||||
| rjsc2000 Newbie Joined: 17/12/2015 Location: PortugalPosts: 13 |
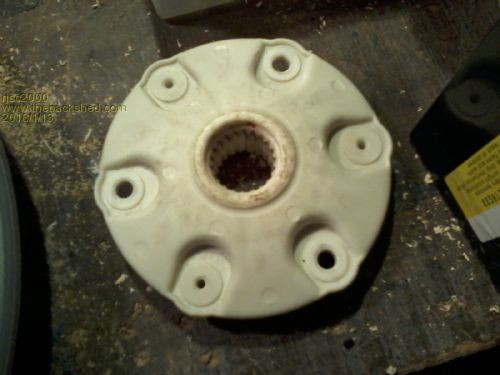
Hi Here goes the photos. Remember that I'm not an expert :D The part that comes with the motor 
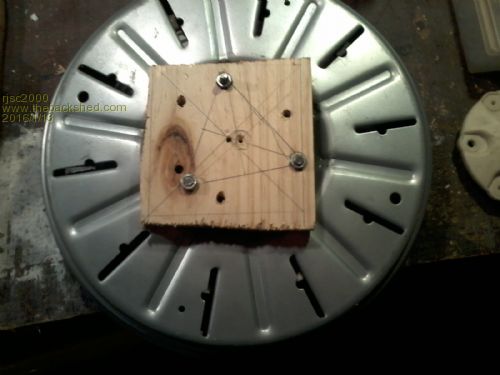
The Rotor 
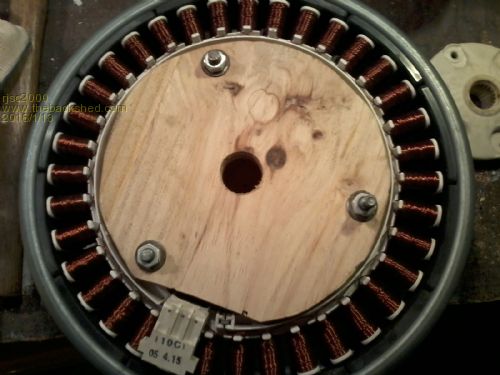
The Stator 
|
||||
| govertical Guru Joined: 11/12/2008 Location: United StatesPosts: 383 |
Hi, nice start. I use 3 bearing hubs and 5/8 drive shaft. https://drive.google.com/file/d/0BwO5zSDThdxFWWNfbHVRdEp4T0U/view?usp=sharing Two bearing hubs with long bolts attach the stator to the frame on one side of the frame. You need to attach the mag hub to drive shaft. https://drive.google.com/file/d/0BwO5zSDThdxFOGwtOVM5QUF4SDg/view?usp=sharing The third bearing hub is attach to the other side of the frame. Then I use a plastic shim to center the stator. https://drive.google.com/file/d/0BwO5zSDThdxFbHV4SWZlcFF3alk/view?usp=sharing I hope this helps, I look forward toward your results. Keep at it, you can do it. just because your a GURU or forum administer does not mean your always correct :) |
||||
| govertical Guru Joined: 11/12/2008 Location: United StatesPosts: 383 |
manual PMA LG This is a thread of my project it may help. just because your a GURU or forum administer does not mean your always correct :) |
||||
| rjsc2000 Newbie Joined: 17/12/2015 Location: PortugalPosts: 13 |
How do you attach the mag hub to the drive shaft? I understand the part of the plastic shim to center the stator, but what do you do after you center it? You mark the holes then? Thanks |
||||
| govertical Guru Joined: 11/12/2008 Location: United StatesPosts: 383 |
https://drive.google.com/file/d/0BwO5zSDThdxFOGwtOVM5QUF4SDg/view?usp=sharing Hub with set screw Hi, I was able to fabricate a hub with set screw to mount the mag rotor to the drive shaft. Fabricate the frame and mount the stator, keep it as centered as possible. Use the the drive shaft to align all the parts. Then mount the mag hub to the drive shaft, keep it as centered as possible. The holes on the stator adapter plate should be a little over sized then use the plastic shim to center the stator to the magnet hub and tighten the bolts. Once the frame and stator mount are fabricate, it will be easier to visualize the all the other required parts. just because your a GURU or forum administer does not mean your always correct :) |
||||
| govertical Guru Joined: 11/12/2008 Location: United StatesPosts: 383 |
https://drive.google.com/file/d/0BwO5zSDThdxFOGwtOVM5QUF4SDg/view?usp=sharing hub with set screw Hi, I was able to fabricate a hub with set screw to mount the mag rotor to the drive shaft. Fabricate the frame and mount the stator, keep it as centered as possible. Use the the drive shaft to align all the parts. Then mount the mag hub to the drive shaft, keep it as centered as possible. The holes on the stator adapter plate should be a little over sized then use the plastic shim to center the stator to the magnet hub and tighten the bolts. Once the frame and stator mount are fabricated, it will be easier to visualize the all the other required parts. just because your a GURU or forum administer does not mean your always correct :) |
||||
| govertical Guru Joined: 11/12/2008 Location: United StatesPosts: 383 |
Sorry for the double post. The net is acting odd. just because your a GURU or forum administer does not mean your always correct :) |
||||
| rjsc2000 Newbie Joined: 17/12/2015 Location: PortugalPosts: 13 |
No problem. |
||||
| govertical Guru Joined: 11/12/2008 Location: United StatesPosts: 383 |
bronze bushing shaft collar Hi, this may help with the parts you may need. Bronze bushing will replace the bearing and a few shaft collars could be glued to the wood to create a hub with set screw to mount the mag hub to the drive shaft. I look forward toward your results and these are just suggestions. Cheers. Place a small piece of copper under the set screw and it will prevent the set screw from marking the drive shaft. It will make it easier to disassemble. When not using the generator I leave the plastic shim between the magnets and the stator, it helps keep everything centered while in storage. just because your a GURU or forum administer does not mean your always correct :) |
||||
| rjsc2000 Newbie Joined: 17/12/2015 Location: PortugalPosts: 13 |
Thanks. At this moment i'm more concerned how i will center all the pieces and make sure the magnets won't stick to one side when assembling. The plastic shim will help but i think the stator and the rotor and the shaft must be perfectly centered so that it doesn't stick to one side. |
||||
| Page 1 of 2 |
|||||