
|

|
Forum Index : Windmills : Vawt...going in a big way
| Page 1 of 16 |
|||||
| Author | Message | ||||
mac46 Guru Joined: 07/02/2008 Location: United StatesPosts: 412 |
First I'd like to say thanks for a really great forum, lots of info, lots of thinking going on here. I'm new to the site as far as posting goes so forgive my deplorable computer skills. I'm a work outside type. I have made the commitment to build a large vertical axis wind turbine and have selected the Geo222 wing profile as my wings. Nearing compleation of the third wing and I'll be giving the thing its first trial in a few weeks/depending on weather ect. Has anyone tried this wing profile on a vawt ? Mac46 I'm just a farmer |
||||
| VK4AYQ Guru Joined: 02/12/2009 Location: AustraliaPosts: 2539 |
Hi Mac It should be a good choice as it slow speed high lift profile, best of luck with your project All the best Bob Foolin Around |
||||
mac46 Guru Joined: 07/02/2008 Location: United StatesPosts: 412 |
Bob, Thank you for you'r response and you'r advice. I;ve been testing many different wing profiles and also various arrangements...just something about a vawt that has cought my attention and I can't seem to shake it off. I've just finished primeing wing #3, useing a 2 part epoxie-primer and so I need to get back to the shop to finish cleaning the spray gun. (I have'nt figured out how to post pictures yet)...any help will be appreciated. Thanks in advance. Mac46 I'm just a farmer |
||||
| Gizmo Admin Group Joined: 05/06/2004 Location: AustraliaPosts: 5078 |
Hi Mac Can I post those pictures you sent me? I was amazed at the quality and size of them, and I'm sure other forum members would be too. I also move this post into the windmill section, more eyes will see it here. This is a picture of a small VAWT I made using the GEO222 extruded blades. It was only small, about 600mm diameter I think, so wont make much power, but it did self start and ran pretty fast. 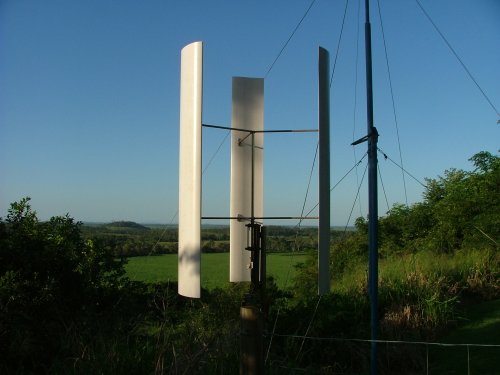
Glenn The best time to plant a tree was twenty years ago, the second best time is right now. JAQ |
||||
mac46 Guru Joined: 07/02/2008 Location: United StatesPosts: 412 |
Hello Glen, Yes by all means go ahead and post the pictures. I'm studying you'r project with great interest, very nice work. Mac46 I'm just a farmer |
||||
| Gizmo Admin Group Joined: 05/06/2004 Location: AustraliaPosts: 5078 |
Here we go. Mac46's photos. 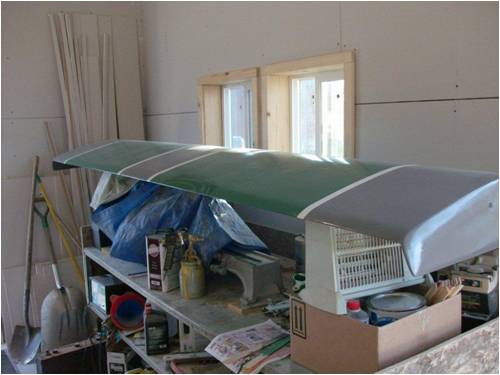
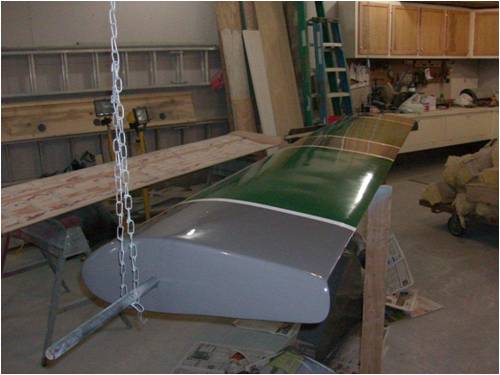
It's a bit bigger than your average home made VAWT! Glenn The best time to plant a tree was twenty years ago, the second best time is right now. JAQ |
||||
mac46 Guru Joined: 07/02/2008 Location: United StatesPosts: 412 |
Thank you for posting the pictures Glen, The wings are made out of spruce for the spar's and 3/16th" hard wood ply wood, waterproof glue was used everywhere, and the entire wing was fiberglassed after final shapeing and sanding. I then used automotive epoxie primer and then the colors were sprayed on. It's been approx. 2 weeks of work to make each of the 3 wings,(thats approx. 80 spare time hours each). The good news is that I'm getting faster with each one, and I'm on my last wing. Spring has arrived now and so the mounths of winter work in the shop are nearly over. In the photos you can see (as Glen stated), rather larger than typical...The wings measure 9feet 4inches L x two feet W and weigh less than 40 pounds each. I've tested them up to 200 pounds center loaded, laying upside down, supported by saw hourses at the outer ends and only 1/4 inch deflection with no apparent difficultity or damage. (all measurements are in USA stds.) First pic. is my very first full size wing, you can see the dust on it from all the sanding ect. I do have a air handler but it still goes everywhere. The second pic. is of wing #2 just after the last color, Wing #3 is in the background to the left in the photo. The final pic. shows where the wings will be mounted, You can't get a good eye on it-looks like pipes goeing everywich way, but there are 6 mounting stations, 3 for wings, 3 for counter weights or test stations for different air foils. The 4 white arms going up and over are 2x4" steel tubeing and will more than likely need futher refinement and braceing. The entire stack measures 24 feet from the ground level to the top of the frame. I guess this summerizes things somewhat, I have learned alot so far and no dought have lots more to learn as time progresses, looking forward to any and all comments both pro and con, so let me have it with both barrells. Thanks again for all the help from the Back Shed people. What a web site! Mac 46 I'm just a farmer |
||||
MacGyver Guru Joined: 12/05/2009 Location: United StatesPosts: 1329 |
Mac46 From one Mac to another, welcome to the 4m. We are at opposite ends of the spectrum. It appears you like to build really BIG stuff, whereas I like small (albeit sometimes too small) projects. I've been away from the 4m for a while attending to my life, but I'm back at it now and will be posting again soon. This is a good place for Do-It-Yourselfers; lots of witty folks here. As for pictures, all you need is a digital camera and a patch cord to load it up to your computer. Once you have a picture on your computer, click on the little icon atop the Post Reply box that has the tree with a blue arrow. That will present a screen that says "Choose File". Click on that and it will allow you to click on the picture saved on your computer. Once it's loaded into your post, you can attach a caption or move it around as you like. Not all file types work, but I've never had a problem with my camera's pictures, so you likely will find it works well for you too. I've tried to import pictures from the Internet, but that's when things sometimes don't like to work. Oh, by the way, that monster on the scooter shown in my avitar is NOT me! I just thought it was such a funny picture, I had to share it. You can load your own avitar picture by going to your profile, but you might have to wait until you're something other than a "newbie" member; I don't remember that far back these days. 
. . . . . Mac Nothing difficult is ever easy! Perhaps better stated in the words of Morgan Freeman, "Where there is no struggle, there is no progress!" Copeville, Texas |
||||
mac46 Guru Joined: 07/02/2008 Location: United StatesPosts: 412 |
Hello MacGyver, Thank you for you'r response, and thank you for the help with posting pictures, I'll give it a go in a bit. I have an Aunt living out you'r way, beautiful country out there. Just corn fields and country roads around here, closest signal light is 18 miles to my west. "how big is to big?" and "how small is to small?". I suppose as long as you can get done what you'r after then size dos'nt really matter much. I know that some tremendous forces can and will be created by these machines, its important to be able to control and understand these as well. Thats where I've got a very steep learning curve ahead of me. Thank you for welcomeing me to the forum, and welcom back to you as well, Life seems to be rather presistant at presenting "opertunities" when we least expect them. I've had my share thats for sure. ......Mac46 I'm just a farmer |
||||
mac46 Guru Joined: 07/02/2008 Location: United StatesPosts: 412 |
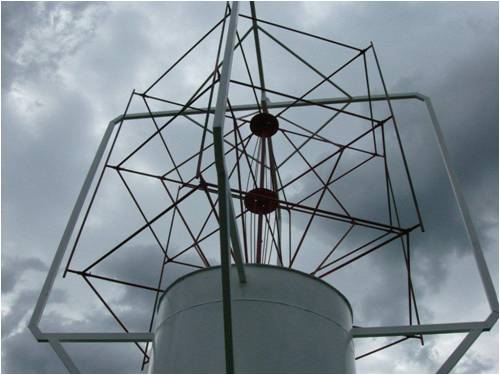
This may give you a better look at the rotating assembly. It's just under 12 feet in dia. x 9 feet.and yes- made on the farm. Mac46 I'm just a farmer |
||||
| shawn Senior Member Joined: 30/03/2010 Location: New ZealandPosts: 210 |
Goodness that is impressive 
I am not a vawt fan but that would look great spinning around. It will give you hours of entertainment just sitting with a beer in hand watching it keep us informed with the progress shawn |
||||
mac46 Guru Joined: 07/02/2008 Location: United StatesPosts: 412 |
Shawn. Hello and thank you for yor'r interest and you'r response. The neighbors are just as curious and interested in the project as well, nothing but positive "vibes" from them. I must say though...the rotating assembly was by far - more challangeing than building the wings. Keeping everything in position and maintaining geometric symetry, every piece the same length ect: and have it come out nearly exactly correct for run out and balance. If I remember it took a small hand full of 5/16" washers to balance it. Wing #3 is ready for the color coats but the weather has been cold and raining for two days. I'll wait for warmer temps. and sunny skies. .....Mac46 I'm just a farmer |
||||
mac46 Guru Joined: 07/02/2008 Location: United StatesPosts: 412 |
This gives you a look inside the wing during construction. Notice the grain is vertical on the ribs, very important for strength. Maintaining a tight fit through out and also keep the wing clamped during construction to prevent warping, all important. You may notice the little strips I'm glueing on the ribs, this is for attaching the 3/16"skin, approx. 1/2 off the 3/16" sits above the rib profile and will be sanded away.(the skin glues on between the ribs). Mac46 I'm just a farmer |
||||
| Xmaswiz Regular Member Joined: 14/04/2011 Location: United StatesPosts: 69 |
WOWWOW  Santa Maria, CA. Noel |
||||
mac46 Guru Joined: 07/02/2008 Location: United StatesPosts: 412 |
Hello Xmaswiz, I really have'nt built full size wings before...only model aircraft wings. I applied the same tecniqs and I admitt I reserched regular aircraft wings also. There are many different types of wings in many different types of materials and probably just as many different ways to "build a wing". The wings here are not, I repeat NOT ment for flight, wings in aircraft follow much stricter guid lines and use different glues, FAA approved procedures, ect. I had more fun and learned so much building these wings, Lots more work than a model aircraft wing though, and cost more of course, but the same basic techniqs apply. (and you still need a dump truck load of clamps). ....Mac46 I'm just a farmer |
||||
mac46 Guru Joined: 07/02/2008 Location: United StatesPosts: 412 |
Mac46 In this picture you can see the the strips better, also the wood spacer/stiffner blocks between the spars. This is to reinforce the mounting area...where the wing bolts to the rotateing assembly, located center and at each end. .....Mac46 I'm just a farmer |
||||
| VK4AYQ Guru Joined: 02/12/2009 Location: AustraliaPosts: 2539 |
Hi Mac Nice job I will be very interested to see how it works out. All the best Bob Foolin Around |
||||
mac46 Guru Joined: 07/02/2008 Location: United StatesPosts: 412 |
Hello VK4AYQ, I will also be in line to see how it works out, very curious creatures these vawt's. Thank you for you'r interest and thank you for you'r coments as well. I've started fabing the connecting brackets and mounting plates, to cold and wet to do any spray painting. I've a brother thats an engineer...don't whant to know what he thinks of my project. He's a good source of formulas, facts, and figures though. Test it till it breaks so you know what to expect he says. Actually he is rather interested as well. ....Mac46 I'm just a farmer |
||||
| VK4AYQ Guru Joined: 02/12/2009 Location: AustraliaPosts: 2539 |
Hi Mac Just one suggestion, when you finish and seal it up slosh the inside with a water based clear varnish with some copper sulphate dissolved in it, here I get it at the produce store and they call it condies crystals its used in the water for chooks to prevent disease. It will prevent fungal growth wrecking your wood construction. You have enough in the paint if it turns light green, try a small amount of paint to see if its compatible with the paint. I mix it in water first and stir into the paint. All the best Bob Foolin Around |
||||
| Greenbelt Guru Joined: 11/01/2009 Location: United StatesPosts: 566 |
Mac46, Welcome to the Forum. The most creative people I've ever known was just a Farmer. A great looking piece of work, The craftsmanship here puts me to shame when I post my used OSB and plywood creations. waiting anxiously for updates. Cheers-----Roe Time has proven that I am blind to the Obvious, some of the above may be True? |
||||
| Page 1 of 16 |
|||||