
|

|
Forum Index : Windmills : The LG Project
| Page 1 of 4 |
|||||
| Author | Message | ||||
| VK4AYQ Guru Joined: 02/12/2009 Location: AustraliaPosts: 2539 |
Hi All I have had the LG motor sitting on my bench for 12 months now, so time to make a start. 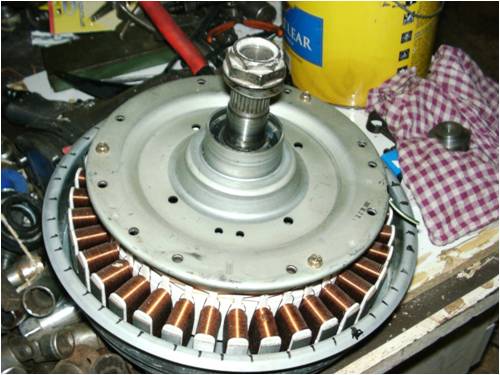
This a quite robust unit with good size bearings and a steel rotor with 48 magnets of the curved ceramic type, these I have removed by heating the outer rim with a electric heat gun to break the adhesion of the glue, they came out easily with a box cutter blade slipped in behind them to break the bond then a screw driver to pop them out, I didn't even break one, miracle for me. I will be fitting neo magnets into the rotor 48 round it and 3 wide, I have got some 10x10x5 mm magnets, as they are .8mm thinner than the original magnets it allows a bit more clearance on the stator and the stronger magnets will make up the difference. One neo magnet is 3 times stronger than the strip ceramic magnet, and there are three across the pole so should be a big improvement. I am using a set of old gyroplane rotor blades that I inherited from the gyro school we had here many years ago, they had a ground strike so couldn't be used on the plane any more. I cut them down to 4 meters diameter and am aiming for a furling speed of 350 rpm in 15 ms wind. Blade attachment plates. The blades are very robust and are designed to lift 500kg in the original configuration, so will have plenty of momentum. The ongoing saga will take several months so i will keep it updated as work progresses. All the best Bob Foolin Around |
||||
| brucedownunder2 Guru Joined: 14/09/2005 Location: AustraliaPosts: 1548 |
Hi Bob ,, Thanks for the latest.. Have you got any info on the Neo magnets ,pi'c , cost, contact Etc.? Have stripped my rotor and it's cleaned ready for the retrofit.. Have some nice blades that I made many years back ,,plus still have the ABS plastic blades that Phill and I made some years back .. Thanks ,Bob. Bruce Bushboy |
||||
| shawn Senior Member Joined: 30/03/2010 Location: New ZealandPosts: 210 |
Looking good 4 meters would that not run two stattors? will one give/extract enough power from your blades. I also am interested in neos it seams the only way to improve my f&p mill!! |
||||
| brucedownunder2 Guru Joined: 14/09/2005 Location: AustraliaPosts: 1548 |
Yeah,, see this is getting interesting.. A pic of the stripped rotor . I usually use those wall tile spacers (bathroom,etc) to evenly space the magnets while attaching them to the roughed up surface of the steel. then , cover the inside surface of the magnets with cloth re-inforced gaffa tape. Then mix the polyester resin and gently pour the spaces between the magnets with the resin ,OH, remove the tile spacers first,lol. Have fun,,, Bruce Bushboy |
||||
| VK4AYQ Guru Joined: 02/12/2009 Location: AustraliaPosts: 2539 |
Hi Bruce I just looked up where I got the magnets and have included the supplier, it looks like that they are out of stock on the 10x10x5 magnets, but I would suggest you drop them an email to see when back in stock. The ones I got where $25 for 25 and I got 150 of them for this rotor, makes it an expensive rotor, but hope it will work out in the long run. I am going to use a high viscosity Ciba Giegy epoxy resin, I used it to seal aircraft fuel tanks so should be good, I will send a photo when I do it. All the best Bob 25 x Block Neodymium Rare Earth Magnets (10mmx3mmx10mm) Item condition: Brand New Quantity: More than 10 available Price: AU $21.75 Buy It NowBuy It Now Add to Watch list Postage: FREE Regular | See all details Estimated delivery within 3-8 business days. Payments: Seller info frenergymagnets ( 7422) 100% Positive feedback Ask a question Save this seller See other items Visit store: Frenergy Magnets Other item info Item number: 230495492954 Item location: Canberra, Australia Posts to: Worldwide History: 18 sold Foolin Around |
||||
| VK4AYQ Guru Joined: 02/12/2009 Location: AustraliaPosts: 2539 |
Hi Shawn You are right the blades are to big for one rotor but thats what I had so press into use for the moment, If the generator works out well I will fit a set of blades from Phill in the future. My place is very low wind so the bigger blades will let me extract more power at lower air speed, but have to furl early to avoid overdriving. I have been looking for another motor to make it a dual stator machine but no luck so far, so decided to go ahead with the single rotor and neo magnets, I read of one on the US forum producing 1500 watts with neos so here I go. Time will tell as to the results, but it is more important to me to extract 2 to 300 watts in low wind speed than a maximum output, very occasionally. I too have a few F&P motors to play with so we will see in the future, I read of one dual rotor with neos producing 1400 watts into a 48 volt battery system, maybe the next project. All the best Bob Foolin Around |
||||
| VK4AYQ Guru Joined: 02/12/2009 Location: AustraliaPosts: 2539 |
Hi all I have fitted a larger bearing in the front of the motor, this is a bit of a safety precaution due to the heavy blade that I am using, the blades weighs 18 KG when assembled so there will be a lot of force on the front bearing when furling. The bearing on the left is the double race bearing, the one on the right is the original single race from the motor. You can see the extra width of the bearing, it is 10 mm wider than the original bearing. This meant turning out the front housing bearing seat 10 mm deeper to accommodate it. You can see how it comes right to the front of the housing in comparison to the original bearing. 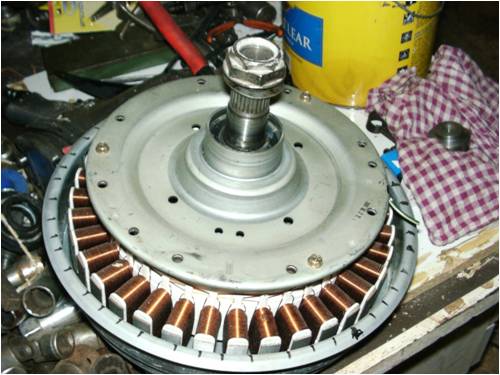
This would be an overkill if using a lighter blade set, as a comparison of bearing sizes. The bearing on the right hand side is the bearing from a Fisher and Pykel 100 series motor, the middle bearing is the original LG bearing and the left hand side one is the heavy duty twin race bearing I have fitted. As you can see this makes the unit a lot stronger, so I hope it is worth the effort. The turning out the housing was a bit of an effort as setting it up in the chuck and getting it running true was time consuming, then it had to be turned slowly as it wanted to ring like a bell from the tool cutting on such a thin section, sorry the photo of doing that didn't come out, due to my exceptional skills of a photographer. I feel it was worth the effort though, but wouldn't recommend it unless you have a lathe or a verticel mill with a boring head. All the best Bob Foolin Around |
||||
| isaiah Guru Joined: 25/12/2009 Location: United StatesPosts: 303 |
It all makes sense if you dont think about it! '  ' 'URL=http://www.motherearthnews.com/Renewable-Energy/1973-11- 01/The-Plowboy-Interview.aspx>The Plowboy Interview[/URL> |
||||
| VK4AYQ Guru Joined: 02/12/2009 Location: AustraliaPosts: 2539 |
Hi All A lull in things to do outside caused by the cold weather and partly frozen hands has given me an incentive to look at LG again as it has been cluttering up my bench for a few months now. Today I decided to fit the Neo magnets to the rotor so a bit of a clean up of existing glue was in order. The glue was quite tough and I actually had to scrape out the thicker bits as the little grinder wasn't coping. The next thing was to separate the neos, these little buggers have a mind of their own, they kept wanting to run to meet each other, to solve this problem I found a piece of perforated metal the back of an old power supply in fact, that way I could lay them out without running away on me. The next thing was to polarize them and mark them, I used a little pole finder I got from frenergy magnets to get the poles sorted out in a controllable fashion. They where all marked with a black marker pen to indicate the south pole, this little doover made it easy, and it works when they are close together as well. The rotor was on an axle clamped to the work bench, not ideal cause it was a bit wobbly but it worked, I then gave the rotor a light coat of slow setting two pac epoxy to hold the magnets in place, the idea was good but they where inclined to slip around on the epoxy like it was oil, so plenty of sticky fingers resulted. you will note that I have used round magnets on this with a bit of spacing and two magnets instead of three, this was because I read an article on magnetic saturation and how once that happens no further gain was to be had, so I did some testing on the original ceramic ferrite magnets and found one button neo was 5 times + stronger so I decided that two would be ten times stronger and should be enough. That's my story and I am sticking to it until proven otherwise by experts. The magnets are 12 mm dia by 6 mm thick with a 6 KG attraction as compared to a piece of the ceramic ferrite magnet at 30 mm x 10 mm with less than 1 kg attraction. There are 96 altogether two rows of 48 and it worked out at .250" spacing with the same between rows. I used a piece of wood to set the spacing's sanded down to .250" It took most of the afternoon to place the magnets so lucky it was cold and the epoxy wasn't going off quick. They where inclined to slide around at the slightest bump, so in hindsight it would have been good to have a spacer for each set but once I started time didn't allow the luxury. As you can see it worked out alright in the end but with sticky fingers. Then I had this sticky goo on the rotor and the temp was heading for 0 deg C so I adjourned to the house and put the oil heater on and sat it on top, now 4 hours later it has gone off, not a full set as yet but should be OK by tomorrow. I will give the rotor a couple of coats of epoxy to reinforce the magnets and make up ad fitting device so it doesn't snap off the ends of my fingers assembling to the stator, the old magnets where nearly impossible to pull apart by hand so these could be much stronger. The cost was over $100 for the magnets so i hope they make a difference to the efficiency, time will tell. All the best Bob Foolin Around |
||||
| BobMann Senior Member Joined: 30/06/2011 Location: United StatesPosts: 134 |
Hello I build a VAWT TREE TOP WIND MILL I build and sell a ready to go Mann Smart Drive using the news 38 pole stator and neo magnets. I use a 3500 LB rated trailer drum and hub modified here at my shop. If you wish I cam sell it ready to go for $400 US plus shipping. All you will have to do is make up the plate to bolt your blades to and the mount for the tail end of the axle shaft. I have not tested on a HAWT I do not see any problem. You are on the right track I have done a lot of testing on this. If I can be of any help just email me Bob Mann |
||||
| brucedownunder2 Guru Joined: 14/09/2005 Location: AustraliaPosts: 1548 |
Nice to follow your progress ,guys .. Bob, be interesting to see the output ,,are you going 24v ? They are certainly stronger and "beefier" than the F&P. Lots of nice pictures Yes, very cold down this way also ,,we have had a cold winter so far , trying to work on my solar tracking frame .. All heavy steel ,so lots of cutting and drilling . Thanks for all the pic's.. Bruce Bushboy |
||||
mac46 Guru Joined: 07/02/2008 Location: United StatesPosts: 412 |
VK4AYQ, Hello Bob, The project looks very good so far. I'll be interested in further posts as the progress continues. Those are quite a set of blades, should'nt have a problem turning the alternator at lower winds. ...Mac46 I'm just a farmer |
||||
| VK4AYQ Guru Joined: 02/12/2009 Location: AustraliaPosts: 2539 |
Hi Bob Nice job on the brake drum I was looking at that solution myself but have too many projects on the go at the moment. I am not sure how your tree top mount will go as I found in the past that if things are not stable there is a lot of airflow interruptions on the blades, ours where however a lot higher speed blade than yours so only time time will tell. Keep up the good work, and I liked the water tower situation just ideal for a big one. All the best Bob Foolin Around |
||||
| VK4AYQ Guru Joined: 02/12/2009 Location: AustraliaPosts: 2539 |
Hi Bruce I will be trying a high voltage unit just for fun, just delta the standard winding's and feed it down the pole. On lathe testing I did before with the old magnets I got 240 volts per phase at 3 + amps per phase I think that was at 350 rpm but cant find my notes on it, as my old laptop suffered storm damage in the problems after xmas time bit hard to compare with the neos now. What I am hoping for is a lower speed cut in with the stronger magnets. Over the next two weeks I will retest with neo's, I have the bits for several type controllers to try so will keep you informed. In this weather steel work in the afternoon sun only, with lashings of Bundy rum to keep the spirits up. All the best Bob Foolin Around |
||||
| VK4AYQ Guru Joined: 02/12/2009 Location: AustraliaPosts: 2539 |
Hi Mac I will keep all posted as I think there is still potential in these little alternators, I am hoping to get 1500 watts out of this one at around 350 rpm time will tell on that, When I tested it originally it did 700 watts per phase with the old magnets but a lot faster to get the volts up to suit my 3 phase heater fan I was using as a dummy load, couldn't get a politician to sit on it so had to improvise. Unfortunately I lost the computer spread sheet I stored it on when Puter Died, I was hoping to have before and after but now will be only after unless I can find another motor to test again. The high voltage way is I feel more efficient as that is what the device was designed to do originally, converting to low volts works but all the extra amps it generates saturates the core, that's what I think anyway, I could be wrong as I have been many times over the last 50 years. The generator Bob Mann is doing could be worth a look for yours as it wouldn't require so much transmission losses, and could be set up as a dual rotor if the power is there to drive it. Just a side point on yours, some vortex generators on the leading edge camber will increase starting torque. All the best Bob Foolin Around |
||||
| VK4AYQ Guru Joined: 02/12/2009 Location: AustraliaPosts: 2539 |
Hi All setting in the magnets in epoxy was a bit of a difficult contract as the epoxy kept creeping to the low side and would have put the rotor out of balance. The solution I found was to spin the rotor and let centrifugal force even it out. 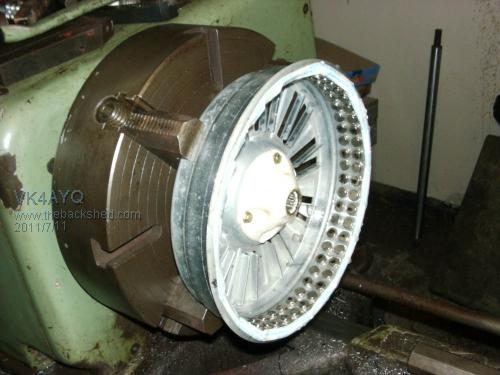
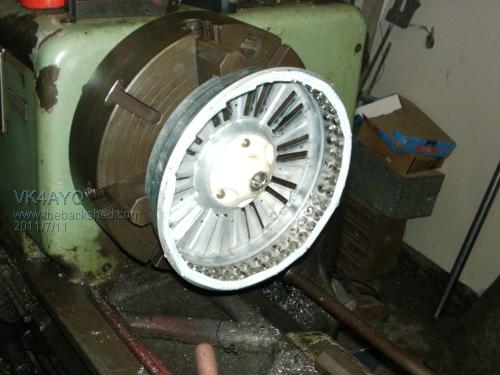
The strobe effect of the flash makes it look stationary, but it is turning at 100 rpm the epoxy is settling in evenly and about .5 mm thick. I used double sided tape as a outer dam as all other tape where dissolved by the epoxy, so far so good it hasn't leaked out yet. All the best Bob Foolin Around |
||||
| Gizmo Admin Group Joined: 05/06/2004 Location: AustraliaPosts: 5078 |
Clever trick Bob. I remember when I worked for Telecom one of the technicians converted a Telix machine printer ribbon take up motor into fishing rod rotiserie. The motor had a worm drive and spun at about 30rpm, once every couple of seconds. He made his own fishing rods, and one of the steps was winding a string around the eyelets, etc. He then set it up on the little motor and got it rotating as he poured epoxy into the rod. The motor would rotate the rod for an hour or so till the expoxy set, and end result was a beautifull even finish with no drips or runs. You should post a picture of that big old 1800's lathe some time. I was at Bruces place a few weeks ago and say the LG motors he had, look like they have lots of potential. Glenn The best time to plant a tree was twenty years ago, the second best time is right now. JAQ |
||||
| VK4AYQ Guru Joined: 02/12/2009 Location: AustraliaPosts: 2539 |
Hi Glenn I am hoping the larger diameter combined with the neo magnets will give a better low speed performance, with 4 meter dia blades I am aiming for 7.5 ms 250 RPM as the working speed to try and capture some low wind power. 250 rpm 1.1 KW and furl at 300 rpm at 9.5 ms for 1.5 kw this gives a working range of 100 HTZ to 130 HTZ so am hoping my transformers will not be to lossey at that speed. If with the neos it will load up at lower speed I will put a set of phills GEO 222 blades at 4.5 meters power between 200 and 235 rpm for 1.2 to 1.6 KW 80 HTZ approx. I read a report from a guy that converted one in the US and was getting 2 kw at 250 rpm but was using low voltage.I am looking at 2.5 amps per phase at 250 volt AC so should be a bit more efficient. Time will tell. All the best Bob Foolin Around |
||||
| BobMann Senior Member Joined: 30/06/2011 Location: United StatesPosts: 134 |
Hello This forum is alot more fun then the USA one's much more help full. I have been told to go for the high voltage for a lot of the same reseens. But the Grid Ties has been the problem and we are working on hard now. For the Water tower I will up grade to a winddy boy or a power one unit. I have to meet the UL rateing for the town. After the start-up I will have some freedom to test other setup we are working on. If some one has some thing that will work and wish's to sell cheaply I would be game. I am at a point with the Tree Top Wind Mill to build a wind tunnel in my back yard. I find using the bridge port/lathe for tesing is good for true RPM output testing. I am going to have to hide it in the back of the barn so my wifey can not find it. I have all the stuff needed to build just neede some time. List of wind tunnel stuff 2, 4 ft green house 4 blade fans belt drive units. 1 gas powered snow blower 8 HP motor or one gas powered Omegen 2CY genrator and add a small plane prop I like that one better if the wife sends me packing I can just build a plane and fly down under. Bob Mann |
||||
| VK4AYQ Guru Joined: 02/12/2009 Location: AustraliaPosts: 2539 |
Hi Bob It will be interesting to see how your wind tunnel goes, I did try one myself years ago but found that doing a scale model didn't relate to the performance of a full size machine. On the high voltage system I have a few home grown ideas to try and will keep you informed as everybody else on the forum. The main reason for the high voltage is to reduce transmission and conversion losses. Do not upset the wife to much as you may end up on a couple of diets at the same time. Long way to fly down under in a little plane cheaper to go on a jet Bus. If you go to the local plane repairer you may be able to pick up a time expires propeller cheap, and it doesn't take a lot of horsepower to drive one at the wind speeds we need to test our devices. In the forum it is mainly guys bouncing ideas around to help one another, but some members who are making useful to all components go into the parts and devices part of the forum to sell bit to other members. Good luck with your development.\\All the best Bob Foolin Around |
||||
| Page 1 of 4 |
|||||