|

|
Forum Index : Windmills : Samsung Stator rewire - Help
| Author | Message | ||||
goingbroke Newbie Joined: 29/05/2012 Location: United StatesPosts: 21 |
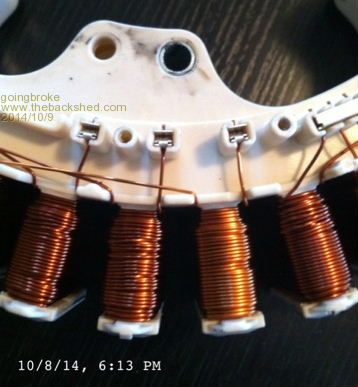
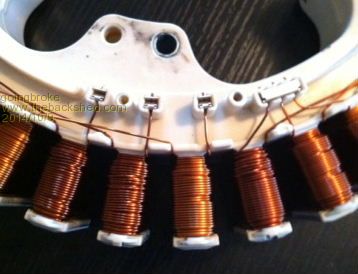
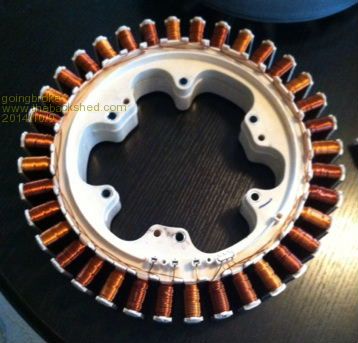
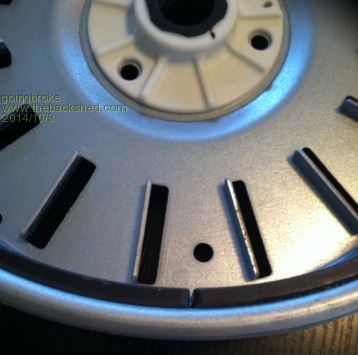
Hi all, I really need your help. I am trying to help my Grandson put together a VAWT. Trust me if I have a chance to get him to stop playing video games, I am all in. I told him if he could find a motor we would go from there. Well this is what he found. I have check this forum and others and found very little about 36 coil stator. And to be honest I have not seen this type of wiring set up. If some one could point me in the right direction to learn more it would be great. We are looking at charging a 12V system or if we can produce enough maybe a grid tie. 


. |
||||
| Gizmo Admin Group Joined: 05/06/2004 Location: AustraliaPosts: 5078 |
Its a good find. Similar to a F&P Smartdrive, which we commonly use for home wind turbines. But need some more info first. How big do you plan to make this VAWT, and what type. Also, what about a HAWT instead, it would give much more power. Of course max power might not be what you want, or you have limited options to raise a tower, so a VAWT would be OK. Glenn The best time to plant a tree was twenty years ago, the second best time is right now. JAQ |
||||
goingbroke Newbie Joined: 29/05/2012 Location: United StatesPosts: 21 |
Hi Glenn, And Thank You very much for your response. As far as the size of the VAWT goes. My thinking is that when I get the correct wiring on the stator. And then doing some bench tests on the possible output of the motor. Using the information from the bench test, to give me a idea what size I need to build. As far as why a VAWT ? Where my Grandson has to put it up, good air and getting it high enough is the main issue. I am looking at Lentz wing design. Allen |
||||
| Gizmo Admin Group Joined: 05/06/2004 Location: AustraliaPosts: 5078 |
For a Lenz I would leave the stator as is. It should generate 12vac 3 phase at low RPM. A Lenz say 2 meter high and wide would be a good size, at a guess. It would make a few watts and spark some interest. Glenn The best time to plant a tree was twenty years ago, the second best time is right now. JAQ |
||||
| Gizmo Admin Group Joined: 05/06/2004 Location: AustraliaPosts: 5078 |
This might interest your. It was a Lenz I built a few years ago. Never did finish off the big one at the end of the article. http://www.thebackshed.com/windmill/articles/Lenz2.asp Glenn The best time to plant a tree was twenty years ago, the second best time is right now. JAQ |
||||
goingbroke Newbie Joined: 29/05/2012 Location: United StatesPosts: 21 |
Hi Glenn, Thank You for all your great input. I have done some basic testing on the motor. And you are right is has plenty of out put. I hooked it up to a 3 phase rectifier to check DC output buy hand turning. It did good 75+ volt DC, but like I have read here, under load it gets very hard to turn. Unless I totally misunderstand that the rewiring would lower output put increase amps and make it turn easier under load. By the way I check out your VAWTs very nice job.. Allen |
||||
fillm Guru Joined: 10/02/2007 Location: AustraliaPosts: 730 |
You can re-wire it and yes, you need higher RPM to make the same volts and will give more amps at higher Rpms because of less coil resistance, but as for making it easier to turn under load " NO " If it producing 100w at 50rpm @24V and you halve the stator " Basicly " now it produces 100W at 100rpm @ 24v , the input load ( torque ) will be almost the same give or take a few grams/Oz. In a nutshell " it changes the Rpm to give the same output , input load stays the same" This is how to get blades to perform better and not be stalled. I have one of those squireled away somewhere here , I am waiting for another and I will do a Dual Stator given the time. As yet they are not as common as the F&P PhillM ...Oz Wind Engineering..Wind Turbine Kits 500W - 5000W ~ F&P Dual Kits ~ GOE222Blades- Voltage Control Parts ------- Tower kits |
||||
Downwind Guru Joined: 09/09/2009 Location: AustraliaPosts: 2333 |
Personally i have never seen a VAWT that has produced enough energy to ever replace the energy it took to build it. So i would look to a HAWT for your build, and even given the limited constraints of the location you will still produce more energy than any VAWT will ever do. Pete. Sometimes it just works |
||||
| solarwind Regular Member Joined: 03/02/2008 Location: South AfricaPosts: 51 |
This looks exactly like the stator of what we in South Africa know as the DD (Direct Drive) made by LG. I have bought a stator and the magnetic rotor from their service and repairs department and have started to make an alternator using a shaft made up by an engineering firm. The whole assembly is in a metal box with plumber block bearings, one on each side. My blades were cut out of pvc pipe from a design elsewhere in the forum. Had a few tests without a tail by holding it head-on in the wind by hand. Hair raising experience! I split the 36 poles in half. Then re-divided the 2 x 18 poles into 3 sets of 6 poles in series (for each half). The original star point then forms the star point for one group of coils. The other half is also connected in star, by connecting the original 3 input wires together. The two star points are then connected together to form a common point. At the splitting point, you are now left with 6 wires: 3 for the one half and 3 for the other half of the coils. These 6 wires are fed to 2 x 3-phase bridge rectifiers and their dc outputs are in parallel. (Could also be in series if higher voltage out is required). The two halves each represent a three-phase alternator and the connection as described gives a 180 deg phase shift between the two star windings. By doing this, the ripple on the rectified side is very small. Turning it slowly by hand at about 1 rev/sec lights up a 24V automotive bulb of 21W and about 27 volts is measured. With the blades on in a stiff breeze, I measured up to 78V. Still have to finish the project some time when I am back home. You don't have success until you've tried it! |
||||
goingbroke Newbie Joined: 29/05/2012 Location: United StatesPosts: 21 |
Hi solarwind….. First thing first. What a great job on your build. And Thank You and every one else for the help. Is the rewiring you described your own or is there a place were you found it. The reason I ask is because I am a little confused. Well OK a lot confused. I am just brain dead I guess. One thing I do know when you get yours all done I would love to see it. Allen |
||||
| govertical Guru Joined: 11/12/2008 Location: United StatesPosts: 383 |
http://www.thebackshed.com/windmill/FPRewire.asp http://www.usvawt.com/cgi/windpower.cgi Hi, I tested VAWT's for 2 years and I can say they work but they are slow. On the plus side they are easy to build and it is a fun project. The first link is for rewiring the F&P. It will give some idea of what is involved. The second link is a online calculator of how much power is in the wind for the size VAWT at different wind speeds. I hope this helps. What is your average wind speed? Good luck with your project, I look forward to your results. just because your a GURU or forum administer does not mean your always correct :) |
||||
| solarwind Regular Member Joined: 03/02/2008 Location: South AfricaPosts: 51 |
Hi Allen, With me being away from home a lot, everything goes a bit slow! If I could just get the opportunity to spend more time on this project! The existing re-wiring is my own, but a lot was learned through this forum, so please take govertical's advice and follow the links suggested. Feel free to question the members of this forum; that is why we are here, because we share common interest in renewable energy projects. First steps I took, was to use a permanent marker and marked all the poles, starting from the original star point (this is the place where you'll see a common connection on one of the terminal blocks on the stator). I just started and marked them R,Y,B,R,Y,B,R,Y,B,.....and so on till you reach the last one (pole number 36 in my and your case). Now you'll notice that all the coils marked "R" are connected in series till the last one, all the coils marked "Y" are in series and all the coils marked "B" are in series. (Three sets of coils; 12 "R" coils, 12 "Y" coils and 12 "B" coils). If the stator is to be divided into 2, it means you'll have 6 coils of each "R", "Y" and "B" in the one half of the stator and 6 coils of each "R", "Y" and "B" in the other half of the stator. Starting from the common star point, count all the coils up to and including the 18th coil. Between the 18th coil and the next half of the stator, 3 wires needs to be cut in such a way that the two halves are electrically disconnected from each other. Now there will be 6 wire ends. Connect 6 flexible flying leads to the cut ends.(Remember to carefully scrape off the enamel on the wires before attempting to solder on the 6 flying leads). Next locate the 3 original wires next to the star point where the power was connected to. Connect them together AND connect them to the original star point. You now have two halves, each with its own star point and each with 3 flying leads. (This resembles a so-called Y/Y6 connection which means 2 star connected sources, differing by 180 degrees, hence the 6 or 6 o'clock). The 6 flying leads have to go to 2 x 3-phase rectifiers (3 leads from each half of the stator are connected to its own rectifier. The DC output of each rectifier is connected in parallel with the DC output of the other; i.e. (+) to (+) and (-) to (-). My rewiring is aimed at a 48V system which already includes solar. You will have to make your own choice of what voltage your system is going to be and follow the instructions proposed by govertical. It is my intention to be an active member and to inform on my progress when it is relevant. I might be reporting more on solar in the near future, but wind will be part of the system soon after that. Good luck and I hope this makes sense! Johann. You don't have success until you've tried it! |
||||
| Jarbar Senior Member Joined: 03/02/2008 Location: AustraliaPosts: 224 |
Great posting Johann  I will need to re read it a few times,but well explained. I will need to re read it a few times,but well explained.
Anthony "Creativity is detirmined by the way you hold your tounge".My Father "Your generation will have to correct the problems made by mine".My Grandfather. |
||||
| solarwind Regular Member Joined: 03/02/2008 Location: South AfricaPosts: 51 |
Thanks for the compliment, Anthony! I have learned a lot from this forum! Regards, Johann. You don't have success until you've tried it! |
||||
goingbroke Newbie Joined: 29/05/2012 Location: United StatesPosts: 21 |
Hi Johann, Anthony Is absolutely right. You did a great job on your explanation. Even a novice like me can follow your instructions. This is the best forum I have found, not only for knowledge,the good people here make it better yet. 
Thank You Allen |
||||