|

|
Forum Index : Microcontroller and PC projects : Step-by-Step Guide for Creating Game Levels on PicoMite VGA
| Author | Message | ||||
| Martin H. Guru Joined: 04/06/2022 Location: GermanyPosts: 1113 |
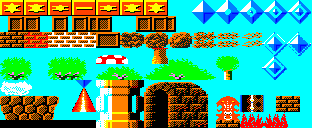
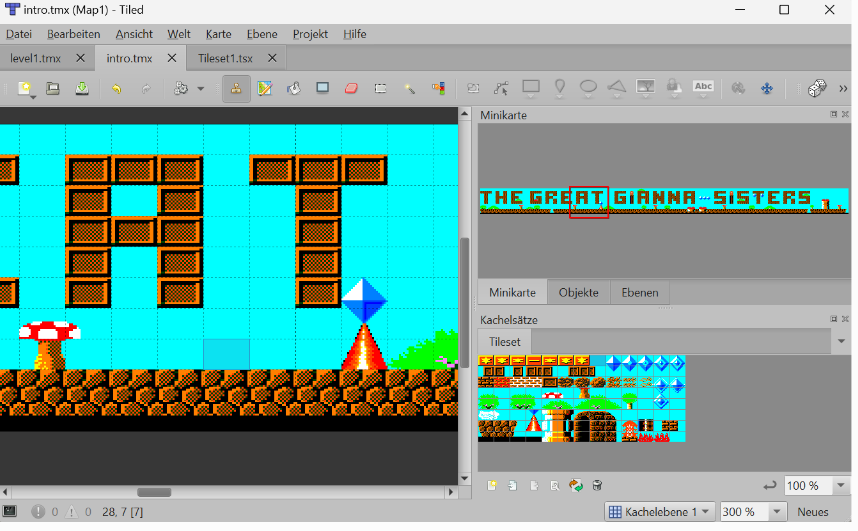
Step-by-Step Guide for Creating Game Levels on PicoMite VGA (Part 1) 1. Create a Tile Image Description: The first step involves creating an image that contains all the tiles you will use in your game. Tools Needed: Paint.net (or any similar drawing program). Steps: Design your tiles, making sure each tile fits within a specific grid (e.g., 24x16 pixels per tile). Convert the image to the 16 colors allowed by PicoMite VGA. You can usually do this by reducing the color palette in your drawing program. Some colors that do not exist in this form must be created by dithering.  example 2. Create the Map Description: After you have your tile image in the correct color format, you need to assemble these tiles into level maps. Tools Needed: TileEd (a tile map editor). Steps: Open TileEd and load your tile image. Use TileEd to arrange your tiles into the desired level maps. This involves placing tiles in the correct positions to create the layout of each level. Once you are satisfied with your level maps, export them as CSV files. TileEd will generate a CSV file that lists the tile numbers in the order they appear in your map.  3. Convert CSV to .map Files Description: The CSV files need to be converted into .map files that your game can use. This involves transforming the tile numbers into ASCII values. Tools Needed: A custom conversion tool (a small script or program you write). Steps: Write a script or program that reads the CSV file. The program converts each tile number into its corresponding ASCII value, so we use only one byte per tile. Save the output as a .map file. 'read csv and write to MAP cls R=0:C=0 dim integer a(10) open "intro.csv" for Input as #1 open "intro.MAP" For Output as #3 open "tmp.bin" for output as #2 nr$="" do n$=input$(1,1) if n$<>"," and n$<>chr$(13) then nr$=nr$+n$ else inc c print #2,chr$(val(nr$),2); print hex$(val(nr$),2);:nr$="":if n$=chr$(13) then ?: Inc r end if loop until eof (#1) close #2 close #1 C=C/R print #3,"MAP"+CHR$(C);Chr$(R); open "tmp.bin" for input as #2 do print #3,input$(1,2); loop until eof(#2) close #2 close #3 kill "tmp.bin" 4. Convert Tile Image to Sprites Description: This step converts the tile image into Spr (sprite format), which PicoMite VGA can use. Steps: Generate SPR Files: Write a program or use an existing tool to take the tile image and break it down into individual sprite files (SPR files). Each sprite file should represent one tile. In my case i use MMB4Windows for this: '-------------------- 'Information of Source here fn$="Tiles.png" W=24 H=16 num=104 '-------------------- ' Dim Col(15):Restore colors:For f%=1 To 15:Read Col(f%):Next f% cls load png FN$ x=0 y=0 For TNR=0 to num-1 tn$="GT"+hex$(tnr,3)+".SPR" open tn$ for output as #1 print #1,str$(W);",1,";STR$(H) for y1=y to y+H-1 WT$="" for x1=x to x+W-1 C=Pixel(x1,y1):cl=0 for n= 0 to 15:if C=col(n) then cl=n Next wt$=wt$+hex$(cl,1) Next ?#1, wt$ next box x,y,w,h,,rgb (white) close #1 inc x,w:if x>311 then x=0:inc y,h next TNR colors: '--Colorscheme accordung to Spritecolors Data RGB(BLUE),RGB(GREEN),RGB(CYAN),RGB(RED) Data RGB(MAGENTA),RGB(YELLOW),RGB(WHITE),RGB(MYRTLE) Data RGB(COBALT) ,RGB(MIDGREEN),RGB(CERULEAN),RGB(RUST) Data RGB(FUCHSIA),RGB(BROWN),RGB(LILAC) 5.Compress Sprites to CSUB: Use Peter's (matherp) program (a specific tool for this purpose) to convert all SPR files in the Folder into one CSUB file. (for later use with Sprite/Blit Memory command. 'program to convert all the sprite files in a directory to a CSUB using compression where appropriate Option explicit Option default none Const separatesubs% = 0 Dim offset% Dim fname$=Dir$("*.spr",FILE) Open "spr_csub.bas" For output As #2 Open "spr_index.txt" For output As #3 If separatesubs%=0 Then Print #2,"CSUB SPRITES" Print #2,"00000000" offset%=0 EndIf Do If fname$<>"" Then code fname$ fname$=Dir$() Loop Until fname$="" If separatesubs%=0 Then Print #2,"END CSUB" Close #2 Close #3 'convert the file f$ to a compressed CSUB Sub code f$ Local i%,j%,h%,l%,w%,n%,s%,il% Local a$,o$,oc$ Open f$ For input As #1 Line Input #1,a$ 'process the dimensions and count w%=Val(Field$(a$,1,",")) n%=Val(Field$(a$,2,",")) h%=Val(Field$(a$,3,",")) If h%=0 Then h%=w% i%=Instr(f$,".") o$=Left$(f$,i%-1) If separatesubs%=1 Then Print #2,"CSUB "+o$ Print #2,"00000000" offset%=0 ' Else ' Print #2,"'"+o$ EndIf Local obuff%(w%*h%\8+128),buff%(w%*h%\8+128) For s%=1 To n% 'process all the sprites in a file Print #3,Str$(offset%) Print #2,"'Offset ";offset% For l%=1 To h% a$="'" Do While Left$(a$,1)="'" 'skip comments Line Input #1,a$ Loop 'make sure all lines are the correct length If Len(a$)<w% Then Inc a$,Space$(w%-Len(a$)) If Len(a$)>w% Then a$=Left$(a$,w%) LongString append buff%(),a$ 'get all the file into a single longstring Next l% j%=0 For i%=1 To LLen(buff%()) LongString append obuff%(),mycol$(LGetStr$(buff%(),i%,1)) Next i% LongString clear buff%() il%=(LLen(obuff%())+7)\8 * 8 i%=0 Do While i%<w%*h% 'compress the data j%=LGetByte(obuff%(),i%) l%=1 Inc i% Do While LGetByte(obuff%(),i%)=j% And l%<15 Inc l% Inc i% Loop LongString append buff%(), Hex$(l%)+Chr$(j%) Loop 'the output must be a multiple of 8 nibbles LongString append buff%(),Left$("00000000",8-(LLen(buff%()) Mod 8)) If LLen(buff%())<il% Then 'compressed version is smaller so use it Print #2,"'"+o$; Print #2," is compressed" Print #2,Hex$(h%+&H8000,4)+Hex$(w%,4) j%=0 For i%=8 To LLen(buff%()) Step 8 'reverse the order o$=LGetStr$(buff%(),i%,1) Inc o$,LGetStr$(buff%(),i%-1,1) Inc o$,LGetStr$(buff%(),i%-2,1) Inc o$,LGetStr$(buff%(),i%-3,1) Inc o$,LGetStr$(buff%(),i%-4,1) Inc o$,LGetStr$(buff%(),i%-5,1) Inc o$,LGetStr$(buff%(),i%-6,1) Inc o$,LGetStr$(buff%(),i%-7,1) Inc j% If j%=8 Then Print #2,o$ j%=0 Else Print #2,o$+" "; EndIf Next i% If j%<>0 Then Print #2,"" Inc offset%,4+LLen(buff%())\2 Else Print #2,"'"+o$; Print #2," is uncompressed" Print #2,Hex$(h%,4)+Hex$(w%,4) LongString append obuff%(),Left$("00000000",8-(LLen(obuff%()) Mod 8)) j%=0 For i%=8 To LLen(obuff%()) Step 8 'reverse the order o$=LGetStr$(obuff%(),i%,1) Inc o$,LGetStr$(obuff%(),i%-1,1) Inc o$,LGetStr$(obuff%(),i%-2,1) Inc o$,LGetStr$(obuff%(),i%-3,1) Inc o$,LGetStr$(obuff%(),i%-4,1) Inc o$,LGetStr$(obuff%(),i%-5,1) Inc o$,LGetStr$(obuff%(),i%-6,1) Inc o$,LGetStr$(obuff%(),i%-7,1) Inc j% If j%=8 Then Print #2,o$ j%=0 Else Print #2,o$+" "; EndIf Next i% If j%<>0 Then Print #2,"" Inc offset%,4+LLen(obuff%())\2 EndIf LongString clear obuff%() LongString clear buff%() Next s% Close #1 If separatesubs%=1 Then Print #2,"END CSUB" End Sub ' 'converts the Ascii colour from the Maximite standard to PicoMite standard Function mycol$(c$) Static cols%(15)=(0,1,6,7,8,9,14,15,2,3,4,5,10,11,12,13) Local i% If c$=" " Then c$="0" i%=Val("&H"+c$) mycol$=Hex$(cols%(i%)) End Function This process compresses the sprite data so it can be efficiently used by PicoMite VGA. By following these steps, you can create and integrate custom game levels for PicoMite VGA. Each step ensures that your tile images and level maps are properly formatted and optimized for use in your game. maybe Volhout can extend the Part for creating a Library out of the CSUB Edited 2024-06-11 17:42 by Martin H. 'no comment |
||||
| Volhout Guru Joined: 05/03/2018 Location: NetherlandsPosts: 4222 |
Hi Martin, This document describes it... Petscii Robots Graphics explained Maybe you can add your way of working into this document, so it becomes a complete overview. Then we have to inform Peter/Geoff, becuase they where planning to add this to Geoff's website, as a "how to". Volhout PicomiteVGA PETSCII ROBOTS |
||||
| Martin H. Guru Joined: 04/06/2022 Location: GermanyPosts: 1113 |
In the first part, we explained how to create the tiles and the maps. Now, it's about getting them displayed on the screen For this example, we need the CSUB file with the graphics in our program. Now we initialise the system. For the map file, we create a string array with the correct length and width. Dim TLIX%(104),map$(12) length 128 Restore GSTIndex spad%=Peek(cfunaddr GSTiles) For F=0 To 103:Read ofs%:TLIX%(F)=spad%+ofs%:Next load_map("intro.MAP") Mode 2 'remove this on Game*Mite next we open the map file and store it in the String array, for this we use a small Sub „load_map() which reads the Size of the map and then transfer the Data into the string array Sub load_map(mp$) Open mp$ For input As #1 a$=Input$(3,#1) If a$<>"MAP" Then Print "Wrong MAP-File Format in File ";mp$:End Map_W=Asc(Input$(1,#1)) Map_H=Asc(Input$(1,#1)) For f=0 To Map_H-1 map$(f)=Input$(Map_W,#1) Next Close #1 End Sub We need a routine that transfers the tiles to the screen as quickly as possible. Instead of scanning the string array with Mid$, I use Peek Byte, which works much faster. FRAMEBUFFER create FRAMEBUFFER write f p=95 CLS Do For ofs%=1 To p t=Timer CLS ':Box 0,16,320,48,,RGB(cyan),RGB(cyan) 'draw screen tx=0:ty=64 n=0 'test: End For n=0 To 9 tx=0 mp=Peek(varaddr map$(n))+1 For f=ofs% To ofs%+14 Blit memory TLIX%(Peek(BYTE mp+(f Mod p))),tx,ty,7:Inc tx,24 Next Inc ty,16 Next Blit FRAMEBUFFER f,n,0,64,0,64,320,160 'FRAMEBUFFER WAIT 'FRAMEBUFFER copy f,n Print @(0,0);Timer-t;" " Next ofs% Loop intro2.zip Edited 2024-06-13 02:02 by Martin H. 'no comment |
||||
| MarkF Regular Member Joined: 01/08/2023 Location: AustraliaPosts: 47 |
Awesome post - thanks. Question. What's the easiest way to create letters (for text) in PicoMite VGA graphics mode? Use the TileEd (a tile map editor)? |
||||
| Martin H. Guru Joined: 04/06/2022 Location: GermanyPosts: 1113 |
So I draw an image of the font and then have it converted to a font by a small MMB4 Windows program see this : Fonts for Mites 'no comment |
||||
| MarkF Regular Member Joined: 01/08/2023 Location: AustraliaPosts: 47 |
Thanks Martin  |
||||